On this page
Iterating fast on machine learning and data science projects is one of the keys to success. Large companies like Meta work hard to optimise this iteration speed, as described in two recent blogposts. Part of the secret comes through being able to quickly switch between a lightweight local environment for rapid prototyping and a higher-capacity production environment for trials using full datasets and larger models. We’ve also previously showcased case studies of how ADEO Leroy Merlin decreased their time-to-market from 2 months to 2 weeks and how Brevo accelerated model development by 80% using ZenML.
In this post I will show you how to move fast with ZenML, leveraging inbuilt features like caching and parameterized runs to allow you to loop over experiments quickly. I’ll also give some general tips on how to move fast and to organize your code to keep the best of both worlds: iteration speed as well as reproducibility.
Run your code easily
The first thing you should work on is getting your code to run end-to-end. Whatever you’re building, just build out a scaffolding that shows the flow of data and logic through all the needed steps. As an example, you can create a simple pipeline that loads data, trains a model, and evaluates it. This will give you a feeling for the overall flow of your project. Feel free to use dummy data or dummy logic for parts that you haven’t quite figured out yet. If your data is complicated or needs a lot of preprocessing, consider using an alternative dataset in a format that’s easy to work with and iterate on. (Think Pandas DataFrames or NumPy arrays for data, and sklearn for models.) You could even use one of the pre-built ZenML templates to get you started.
In practice: start off with just the simplest of pipelines:
import pandas as pd
from zenml import pipeline, step

@step
def data_ingestion() -> pd.DataFrame:
    return pd.DataFrame()

@step
def preprocess(raw_data: pd.DataFrame) -> pd.DataFrame:
    return pd.DataFrame()

@step
def train(input_data: pd.DataFrame) -> str:
    # train your model
    return 'we trained a good model here'

@step
def evaluate(model: str) -> int:
    return 100

@pipeline
def e2e_pipeline():
    raw_data = data_ingestion()
    input_data = preprocess(raw_data)
    train(input_data)
    evaluate(model)

e2e_pipeline()
This is the most basic of pipelines, and even not all of the types being returned make sense. Our model isn’t a str, but we can first work on getting the earlier steps of the pipeline working but still have the rest of the pipeline run fully through and develop naturally.
You’re using ZenML, so you’ll be thinking about your code in terms of pipelines and steps. You’re already two steps ahead! This modular approach will make it easy to experiment with different parts of your pipeline without having to rebuild the whole thing. You get this for free when building pipelines, and it allows you to easy swap out steps or functionality. You can reuse pipeline steps across different experiments and you can iterate fast on specific parts of the pipeline without affecting others.
Another benefit of using ZenML that you get for free is the cache. Intermediate results get cached automatically, so you don’t have to re-run steps that have already been executed. This gives you the freedom to focus on the steps that are causing you problems and removes the need to rerun or spend time executing steps where there is no problem. This reduces overall execution time.
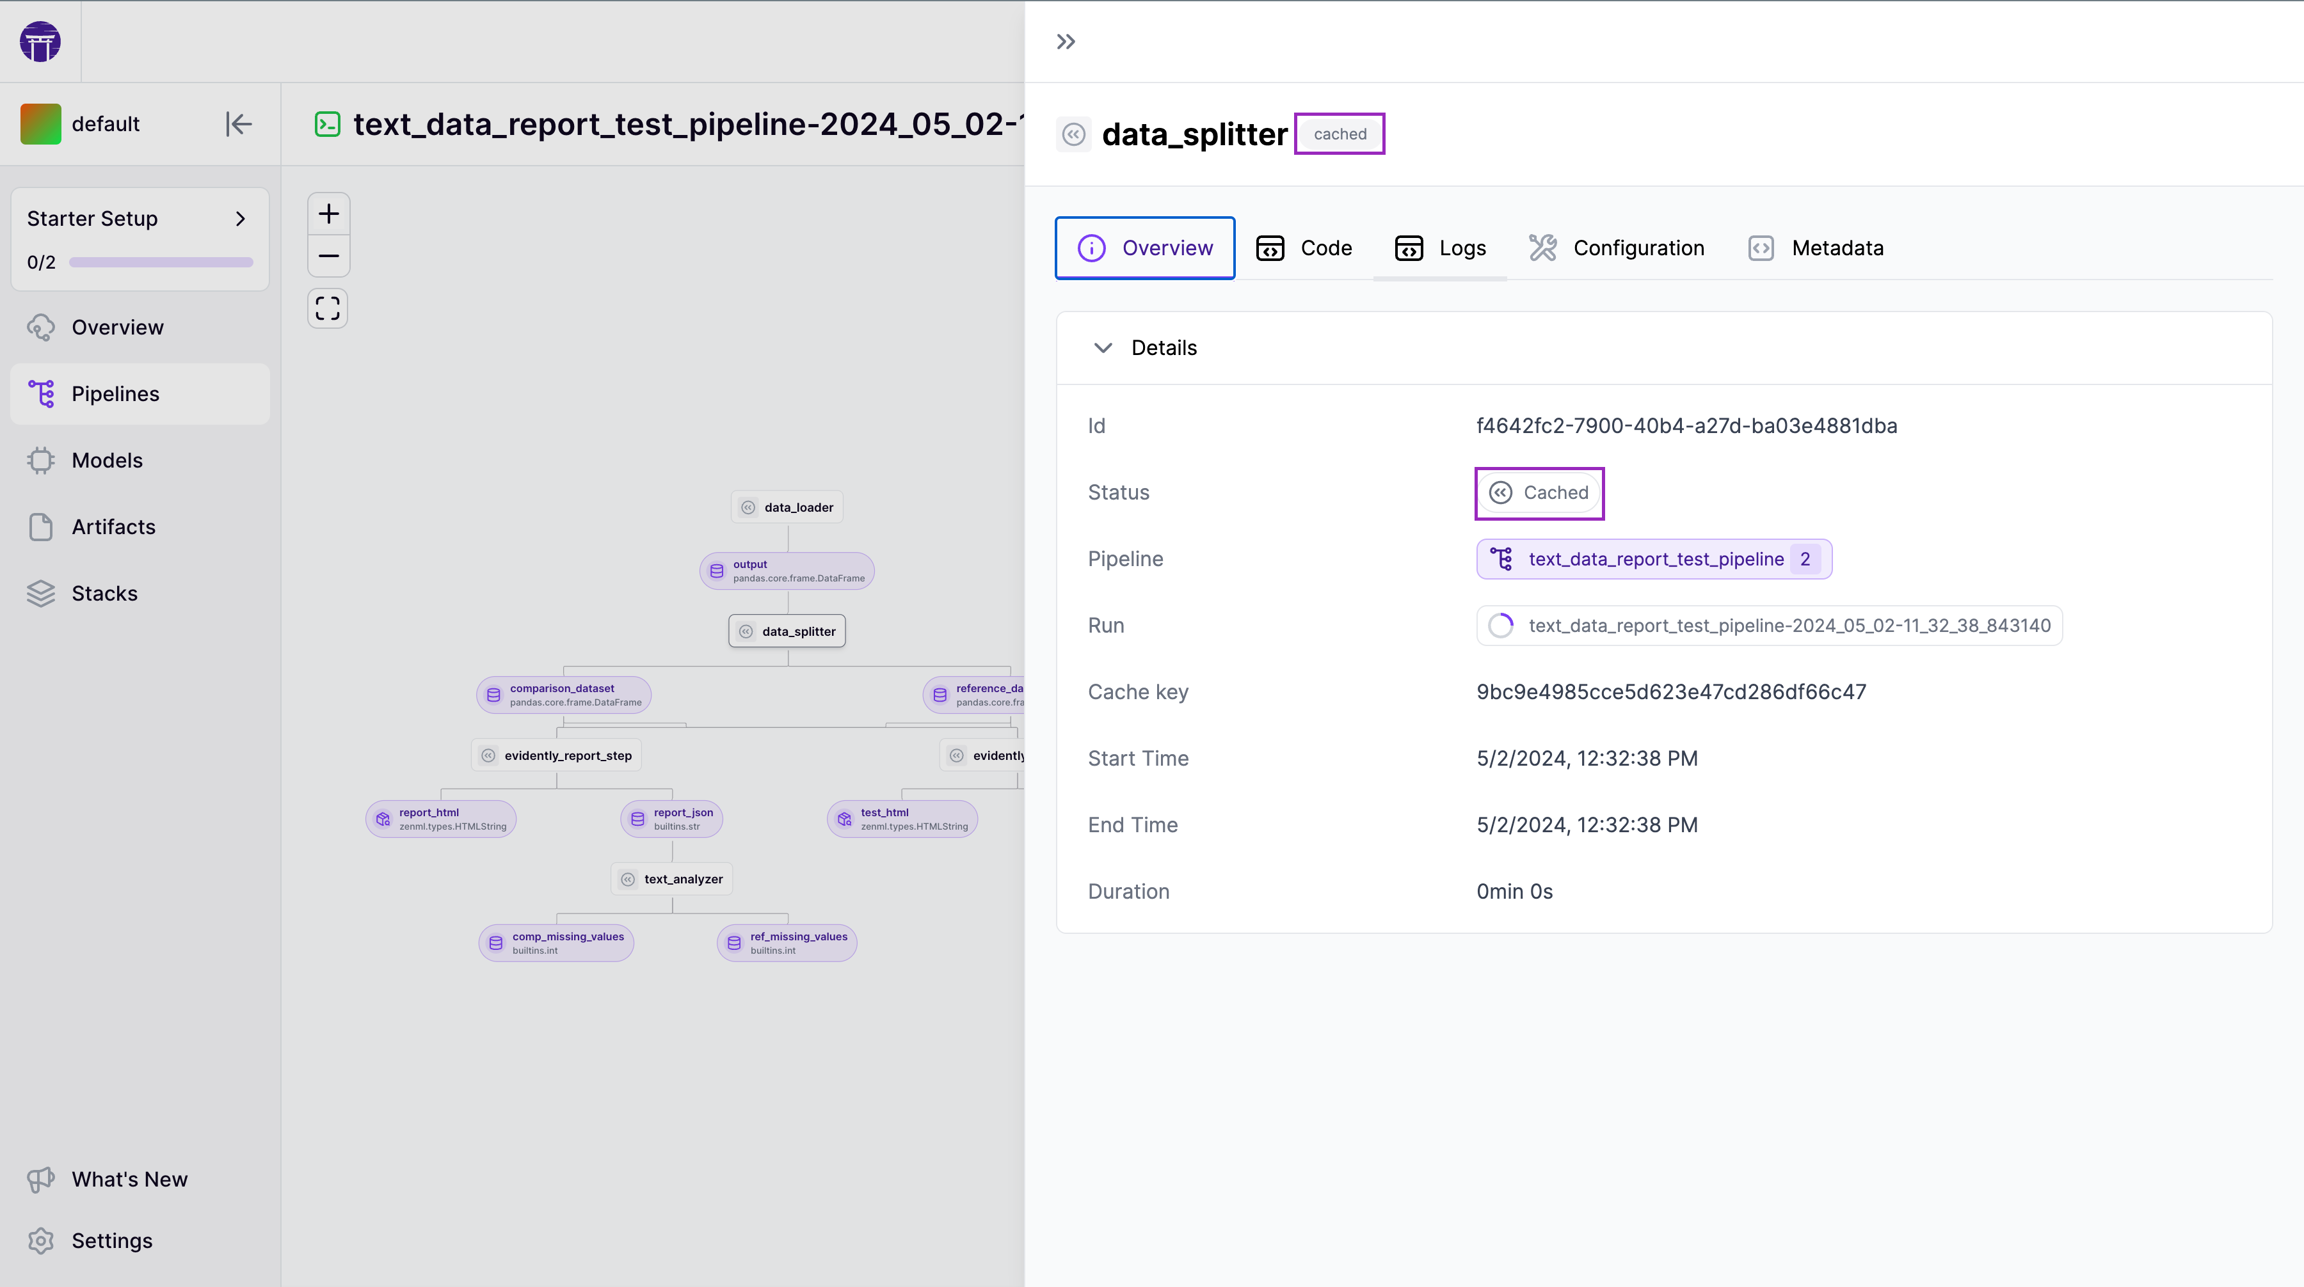
For projects with significant infrastructure requirements, the cache will come in handy as you can run your pipeline in the cloud and then iterate on downstream steps using a local machine without having to rerun the whole pipeline. ZenML will just use the outputs of the cached steps (i.e. the ones that needed to be run on a remote machine, potentially with GPU acceleration) and you can continue your work locally. (Read the docs to learn more about how to control caching behaviour.)
In the early stages of a project you’ll also want to start with a strong and/or reasonable baseline. The specifics of what this looks like will differ from case to case, but having an end-to-end pipeline that executes without errors and that uses a industry-standard pre-trained model is a great place to start. This implementation serves as a reference point for all future iterations, allowing you to quickly assess whether changes are actually improving performance. It could even mean just replicating a pre-existing tutorial or a very basic version of some code that does what you need, where you just split it up into ZenML steps and replicate it identically.
Once you have a working version of what you’re hoping to achieve, that’s when it’s time to start optimising for speed.
Optimise
We recommend using a run.py file at the project root which you can set up to take CLI arguments and to use this to control how you’re running your pipelines. This allows you to quickly pivot between a fast-running local setup and a longer-running production setup without having to change your code. The code might look something like this:
import os
from typing import Optional

import click
import yaml
from pipelines import training

from zenml.logger import get_logger

logger = get_logger(__name__)

@click.command()
@click.option(
    "--local",
    type=click.BOOL,
    is_flag=True,
    help="Whether to run the pipeline locally.",
)
@click.option(
    "--kubernetes",
    type=click.BOOL,
    is_flag=True,
    help="Whether to run the pipeline on Kubernetes.",
)
@click.option(
    "--no-cache",
    is_flag=True,
    default=False,
    help="Disable caching for the pipeline run.",
)
def main(
    local: bool = False,
    kubernetes: bool = False,
    no_cache: bool = False,
):
    config_folder = os.path.join(
        os.path.dirname(os.path.realpath(__file__)),
        "configs",
    )

    if local:
        pipeline_args = {}
        if no_cache:
            pipeline_args["enable_cache"] = False
        pipeline_args["config_path"] = os.path.join(
            config_folder, "local_config.yaml"
        )
        training.with_options(**pipeline_args)()
        logger.info("Local pipeline finished successfully!\n")
    elif kubernetes:
        pipeline_args = {}
        if no_cache:
            pipeline_args["enable_cache"] = False
        pipeline_args["config_path"] = os.path.join(
            config_folder, "kubernetes_config.yaml"
        )
        training.with_options(**pipeline_args)()
Here you can see that we’re using the with_options method to pass in the configuration for the pipeline run. This allows us to easily switch between different environments. We’ve set up configuration files for a local environment and a VertexAI environment, and we’re using the --local and --vertex flags to switch between them. So running python run.py --local will run the pipeline locally and python run.py --vertex will run the pipeline on Kubernetes. Note that the different configuration files do more than just specify the stack on which the pipeline runs, but they can also be used to specify the parameters for the pipeline run. (Read our docs to learn how to configure a pipeline with a YAML file.)
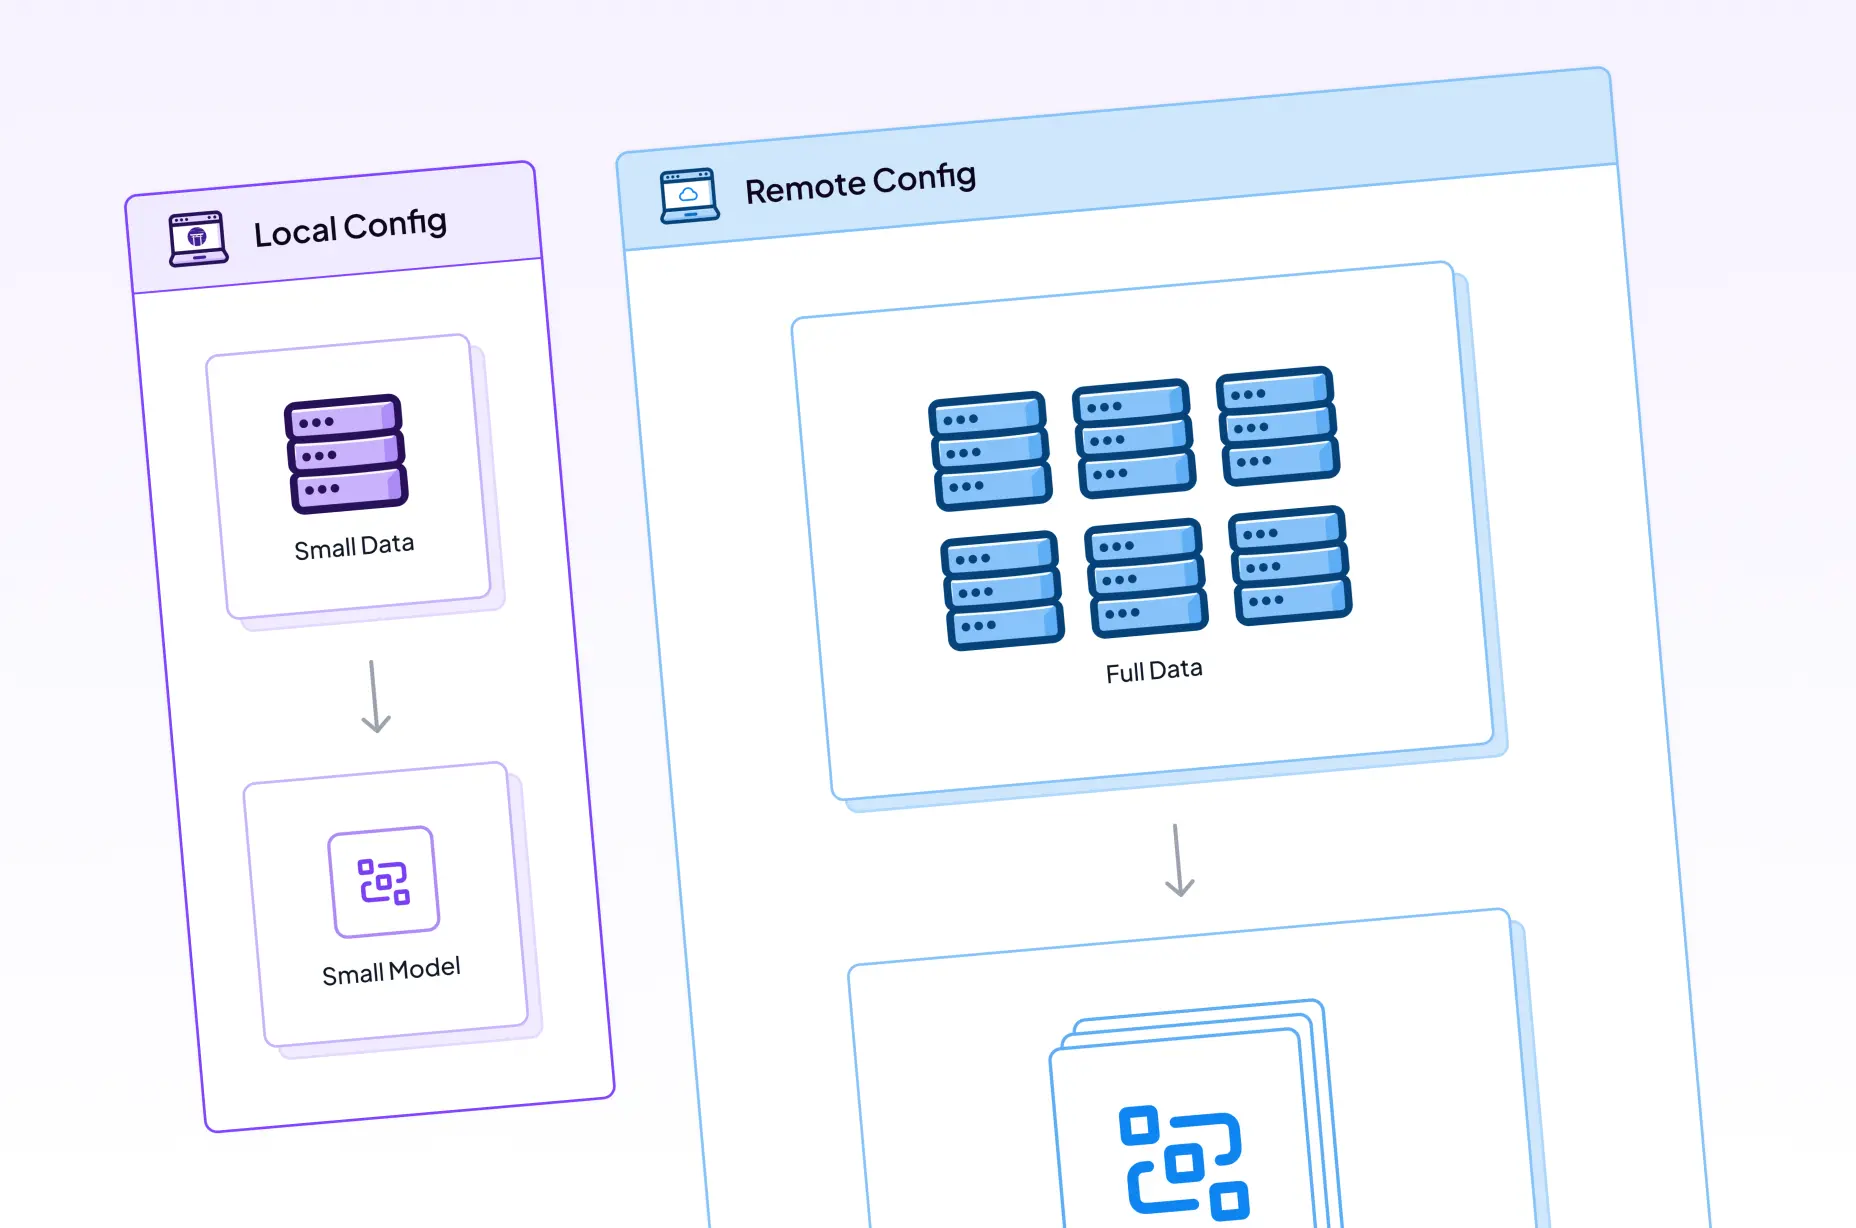
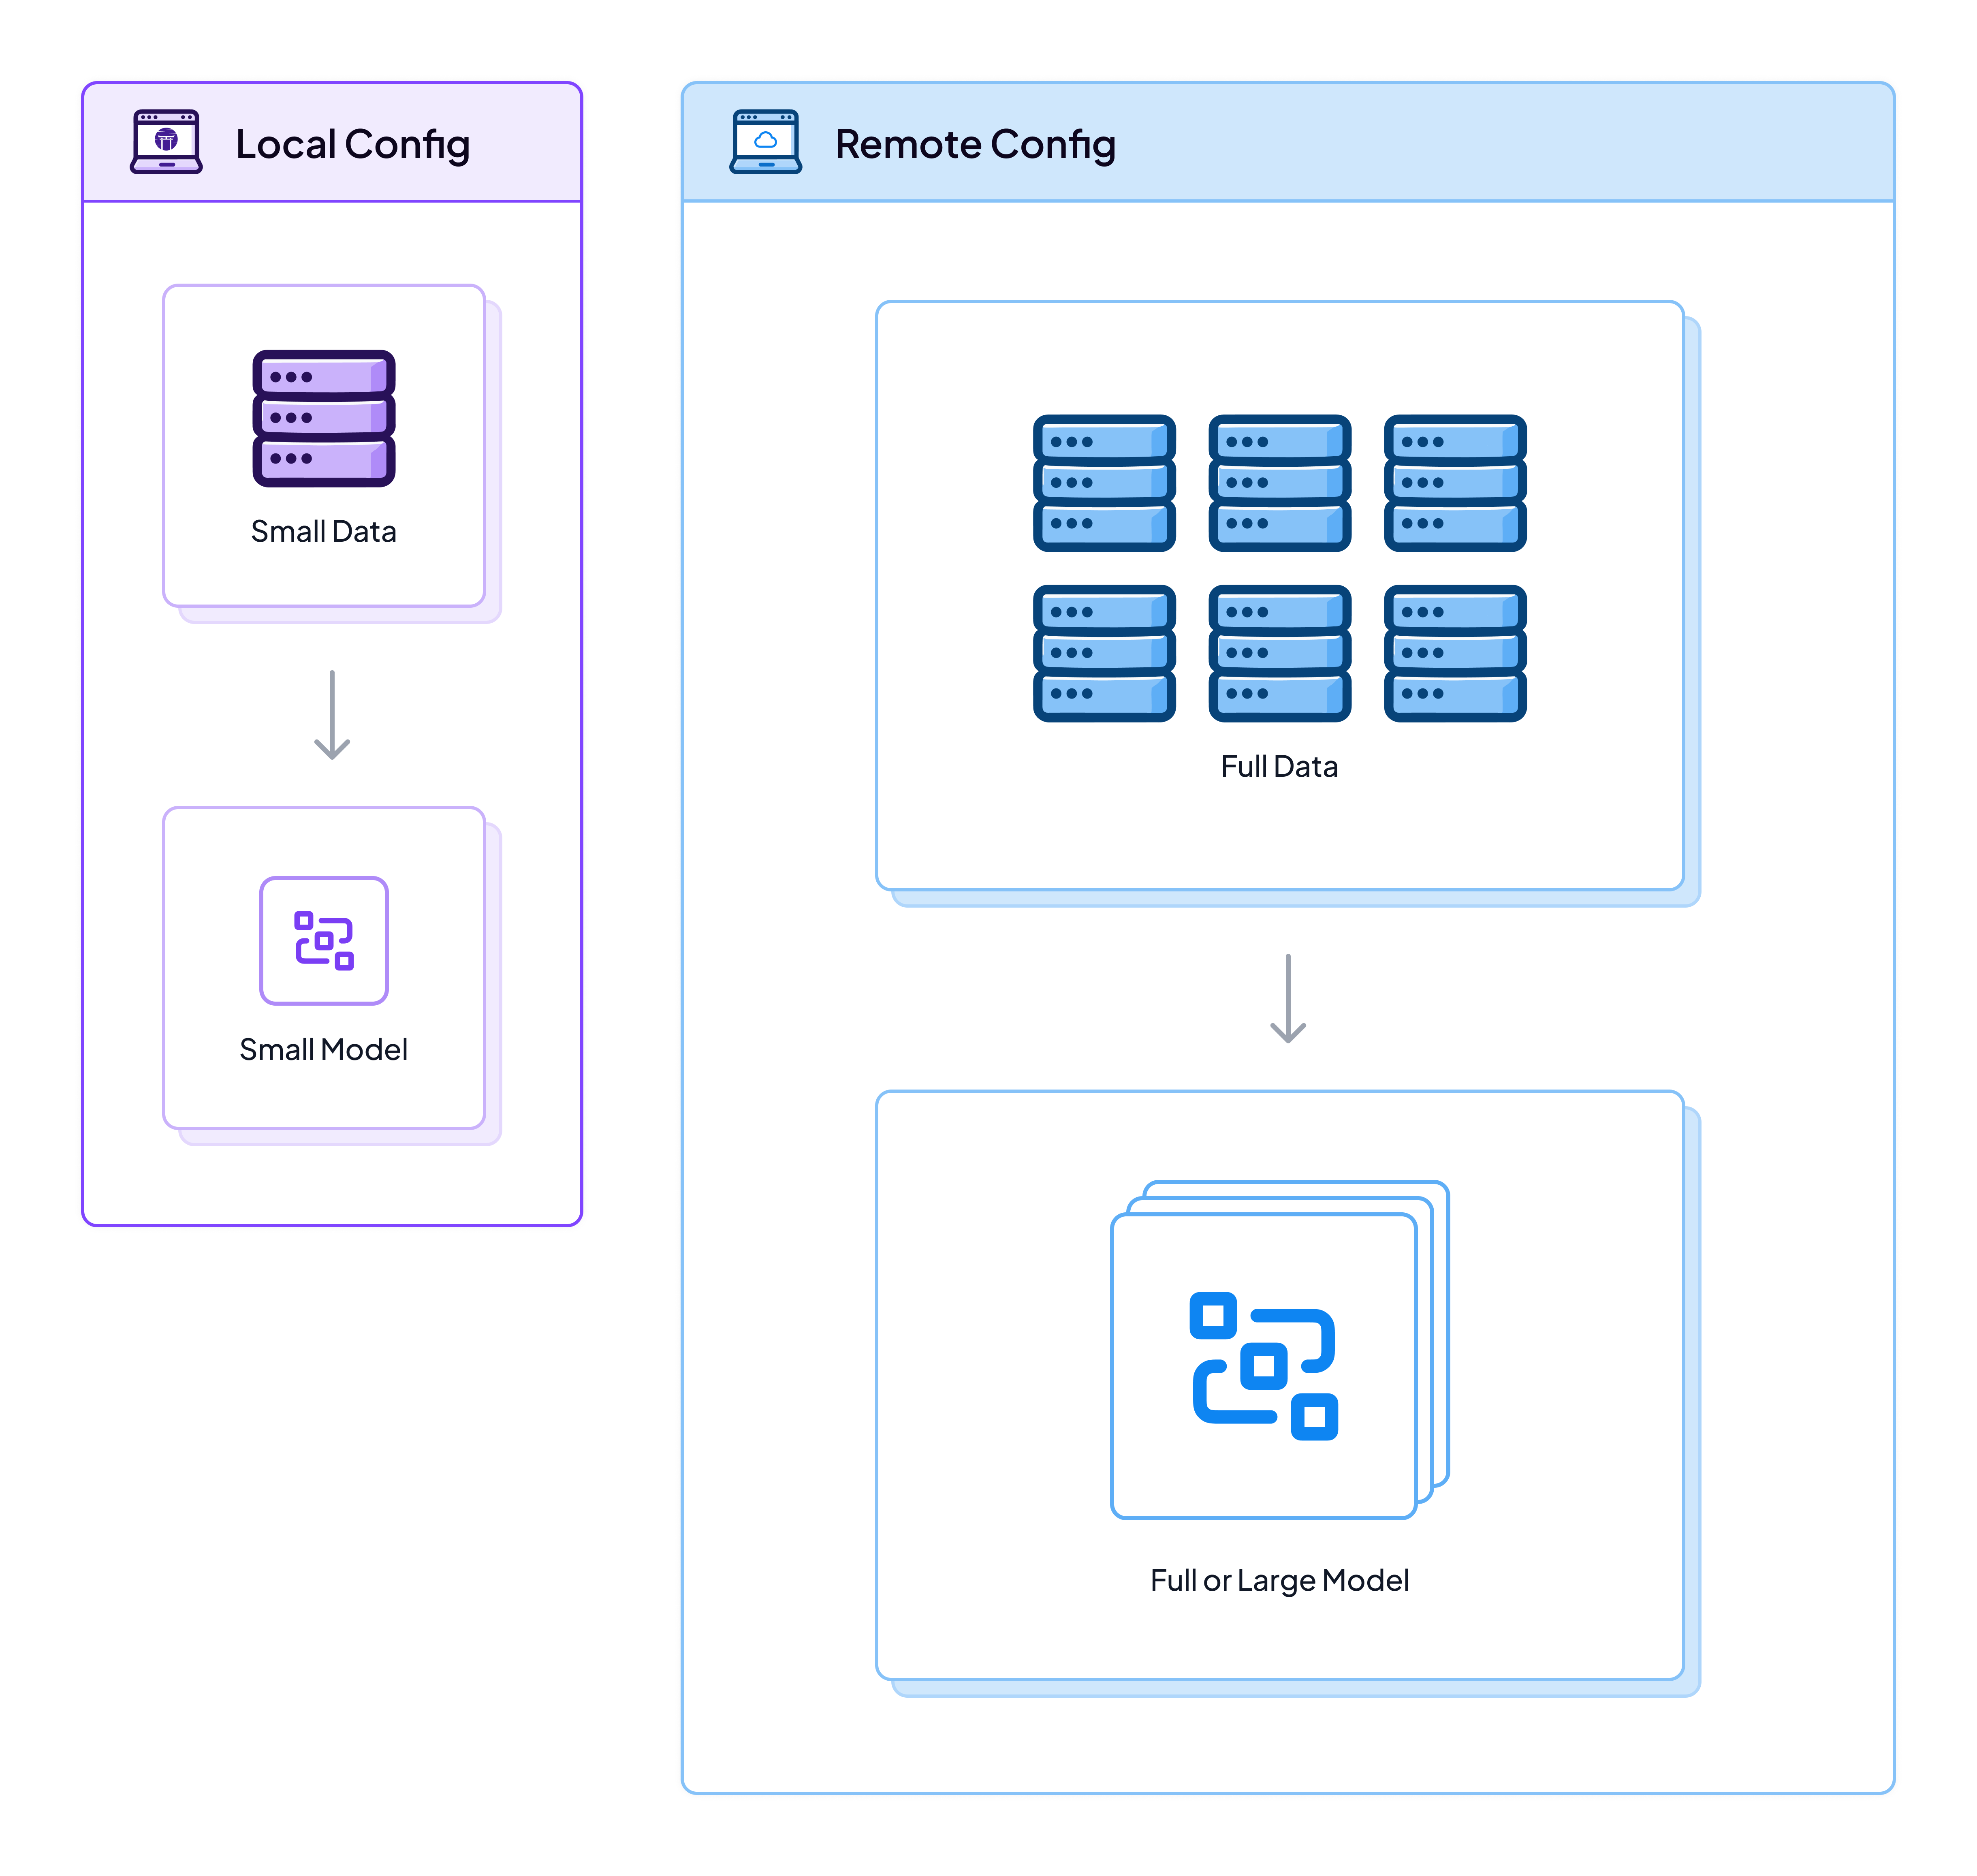
So in the above case, the local_config.yaml could specify a small slice of the data to use for training, a smaller pre-trained model being used for finetuning and even fewer epochs perhaps. The vertex_config.yaml could specify the same, but it would also specify a larger pre-trained model, more epochs or whatever else made sense in your particular use case. The remote config might look something like this:
model:
  name: llm-peft-microsoft-phi-2
  description: "Fine-tune `microsoft/phi-2`."
  tags:
    - llm
    - peft
    - microsoft/phi-2
  version: 300_steps

settings:
  docker:
    parent_image: pytorch/pytorch:2.2.2-cuda11.8-cudnn8-runtime
    requirements: requirements.txt
    python_package_installer: uv
    python_package_installer_args:
      system: null
    apt_packages:
      - git
    environment:
      PJRT_DEVICE: CUDA
      USE_TORCH_XLA: "false"
      MKL_SERVICE_FORCE_INTEL: "1"

parameters:
  base_model_id: microsoft/phi-2
  use_fast: False
  load_in_4bit: True
  system_prompt: |
      Given a target sentence construct the underlying meaning representation of the input sentence as a single function with attributes and attribute values.
      This function should describe the target string accurately and the function must be one of the following ['inform', 'request', 'give_opinion', 'confirm', 'verify_attribute', 'suggest', 'request_explanation', 'recommend', 'request_attribute'].
      The attributes must be one of the following: ['name', 'exp_release_date', 'release_year', 'developer', 'esrb', 'rating', 'genres', 'player_perspective', 'has_multiplayer', 'platforms', 'available_on_steam', 'has_linux_release', 'has_mac_release', 'specifier']

steps:
  prepare_data:
    parameters:
      dataset_name: gem/viggo

  finetune:
    retry:
      max_retries: 3
      delay: 10
      backoff: 2
    step_operator: gcp_a100
    parameters:
      max_steps: 300
      eval_steps: 30
      bf16: True
The local config would look much the same without the line step_operator: gcp_a100 which configures the finetune step to use an A100 on GCP’s VertexAI as its runner.
This paradigm of using smaller slices of data, smaller models and lower values for certain parameters is common in machine learning, and it’s a good way to iterate fast. You use your local stack and your local setup to get things working and to carry out experiments and at a certain point you switch the flag on the python run.py command and you’re good to go. This workflow allows you to identify potential issues or problems early and then to smoothly transition to a full-scale execution flow.
📢 Tip: Using the same cloud/remote artifact store for both local and cloud stacks will mean that you can benefit from cached outputs and versioned code and logs across the full extent of your experimentation. If you’re only using a local artifact store you’ll lose some of these benefits and your ability to visualise what’s going on through the Dashboard will be limited.
Once you have this ability to quickly switch between infrastructures and configurations of data and models, you can then start to consider more involved or robust experimental setups like the one we showcase in our Gitflow project.
Parameterisation is, in general, a good way of thinking about how to make your experiments more robust and less brittle. You get your code set up in such a way that you’re not fiddling with the step code itself to change parameters, but rather you’re just passing in different parameters when you run the pipeline. It’s also much more user-friendly and flexible to use with the ZenML dashboard as you can see the parameters for each run and you can also see the results of each run in the same place. (See our docs to learn about all the parameters you can configure for your pipelines.)
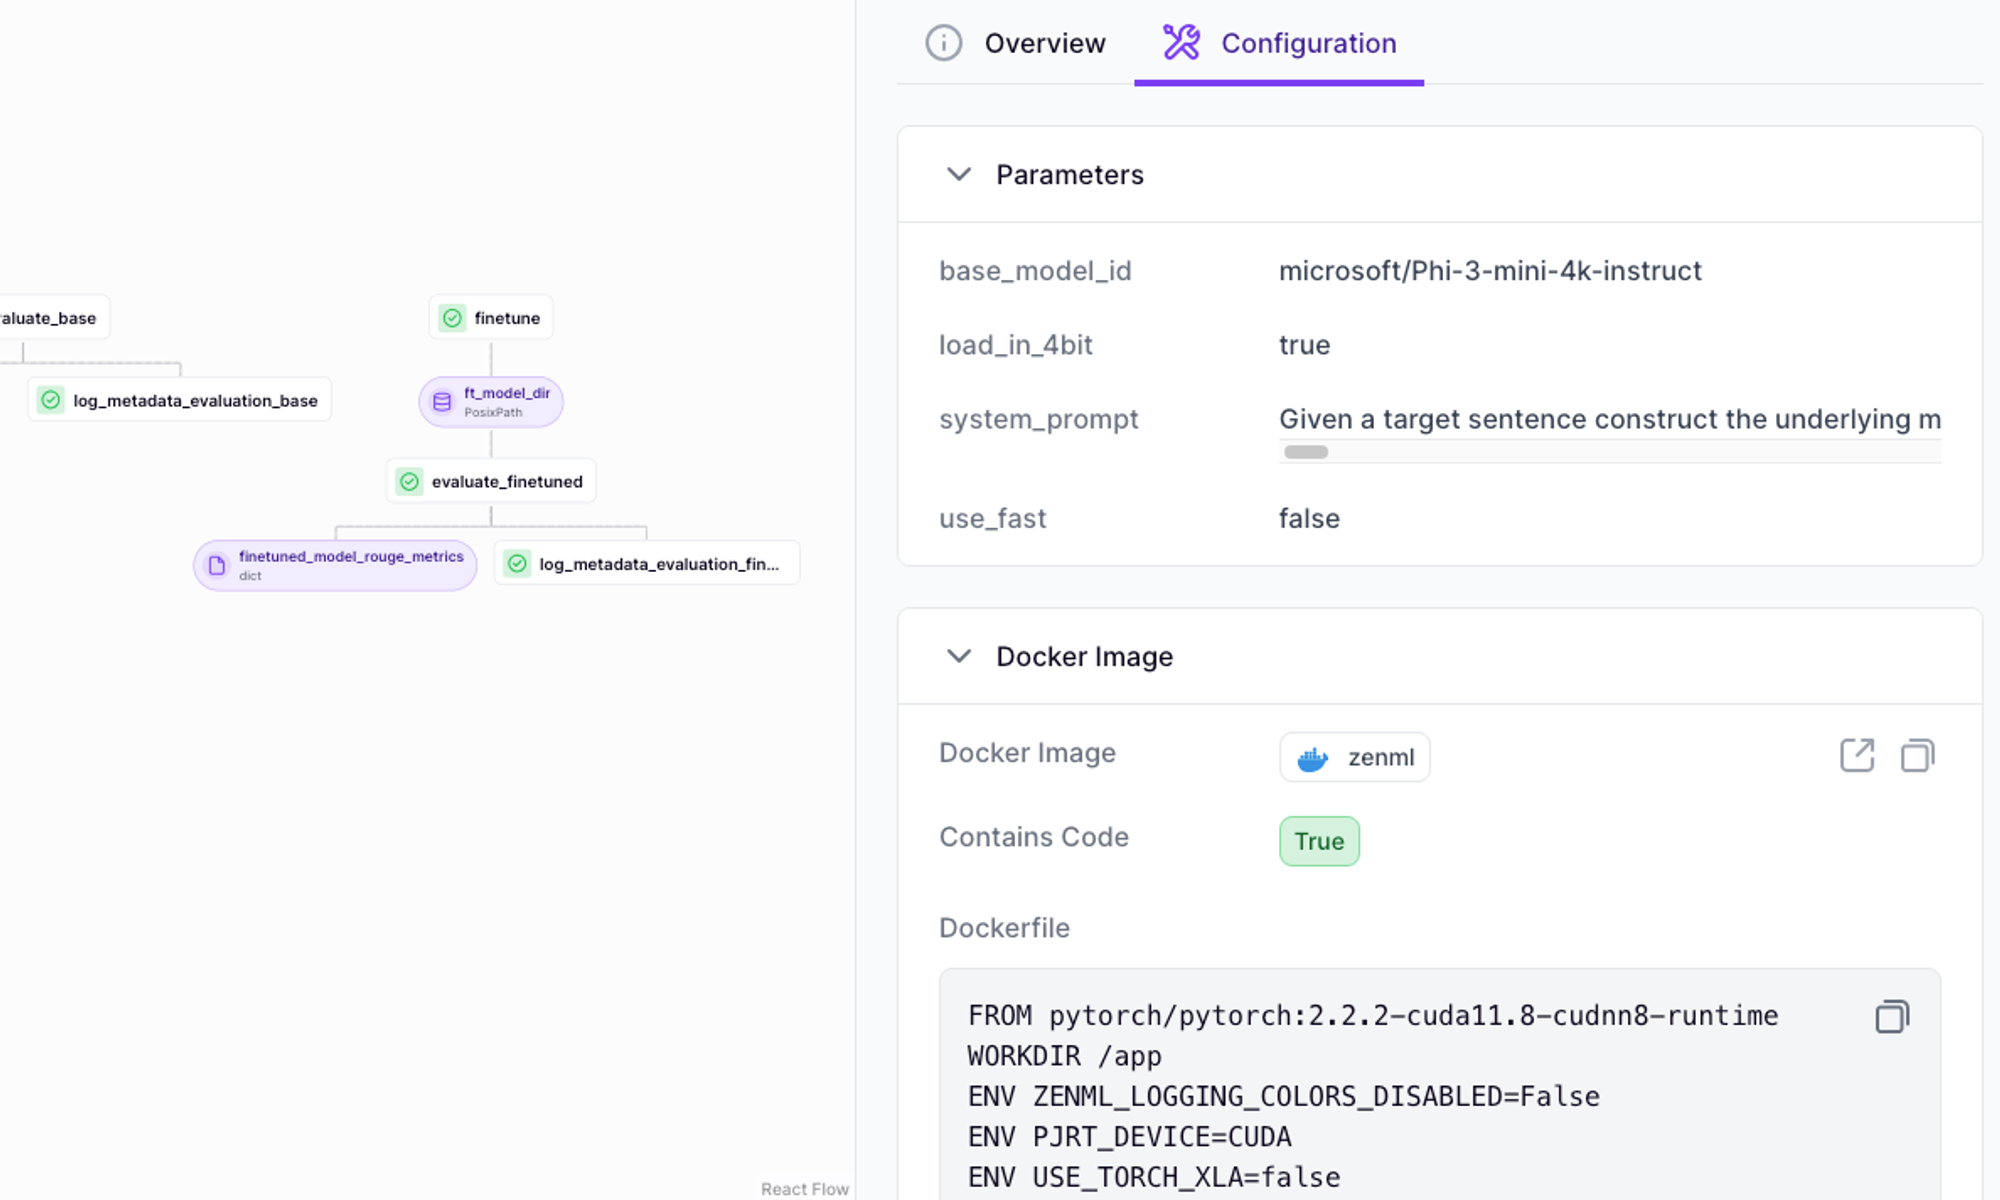
In the configs folder for our example of how to finetune a LLM using LoRA you can see how to specify which datasets get used for the finetuning, how many epochs to run, which environment variables get passed into the pipeline steps as well as configuration of which stack components (in this case an A100 GPU-accelerated machine hosted on GCP).
If you’re not a fan of YAML files or switching back and forth between your pipeline definition and a config file, you can always specify any and all configuration parameters directly in your Python code. The options for what can be configured can all be passed in the Python decorators for the @step or the @pipeline. The ones you’ll use most often in this scenario of wanting to iterate fast are:
parameters(to specify runtime parameters)enable_cache(to enable / disable caching for a pipeline or step)settings(essential for controlling the Docker build process and for specifying resource constraints)
All these parameters that you specify (whether in code or using a YAML config file) are saved, tracked and versioned automatically by ZenML. You’ll likely use the Dashboard as a way of viewing the specific config used for a particular run.
Version, Track, Log, Visualize
Iterating fast is all fine and well until the moment when someone asks you to repeat an experiment from a few days ago with a slightly different configuration. If you haven’t set yourself up for success from the beginning, you might find it hard or even impossible to reproduce the experiment exactly. Luckily this is where ZenML shines as this is truly at the core of the work of MLOps, where reproducibility and automation are key.
ZenML automatically tracks the inputs and outputs of steps automatically, ensuring that you can reproduce the exact same results every time. It also automatically logs all the parameters and metrics that you’ve specified, so you can see exactly what you’ve done and why. If you need to have more finegrained control over your data versioning, you can do so. We also version the code you use to run your pipelines and this is available in the Dashboard as well.
If you use a cloud artifact store, any logs output during the pipeline run are also stored and visible just a click away in the Dashboard. You’ll want to log liberally as part of your step code as all of this will be stored and you can inspect these directly in the dashboard.
The Model Control Plane is a way of tracking all the different pieces of your machine learning project and giving a unified view across different cross-sections. All the pipelines, artifacts, metadata and config associated with a particular business use case can be grouped together under the concept of a Model. (This is different from a so-called ‘technical model’ which is the actual model file or files that hold the weight and parameters of a machine learning training result.) Use this Pro feature when you want to take a step back from your iterations and see the big picture.
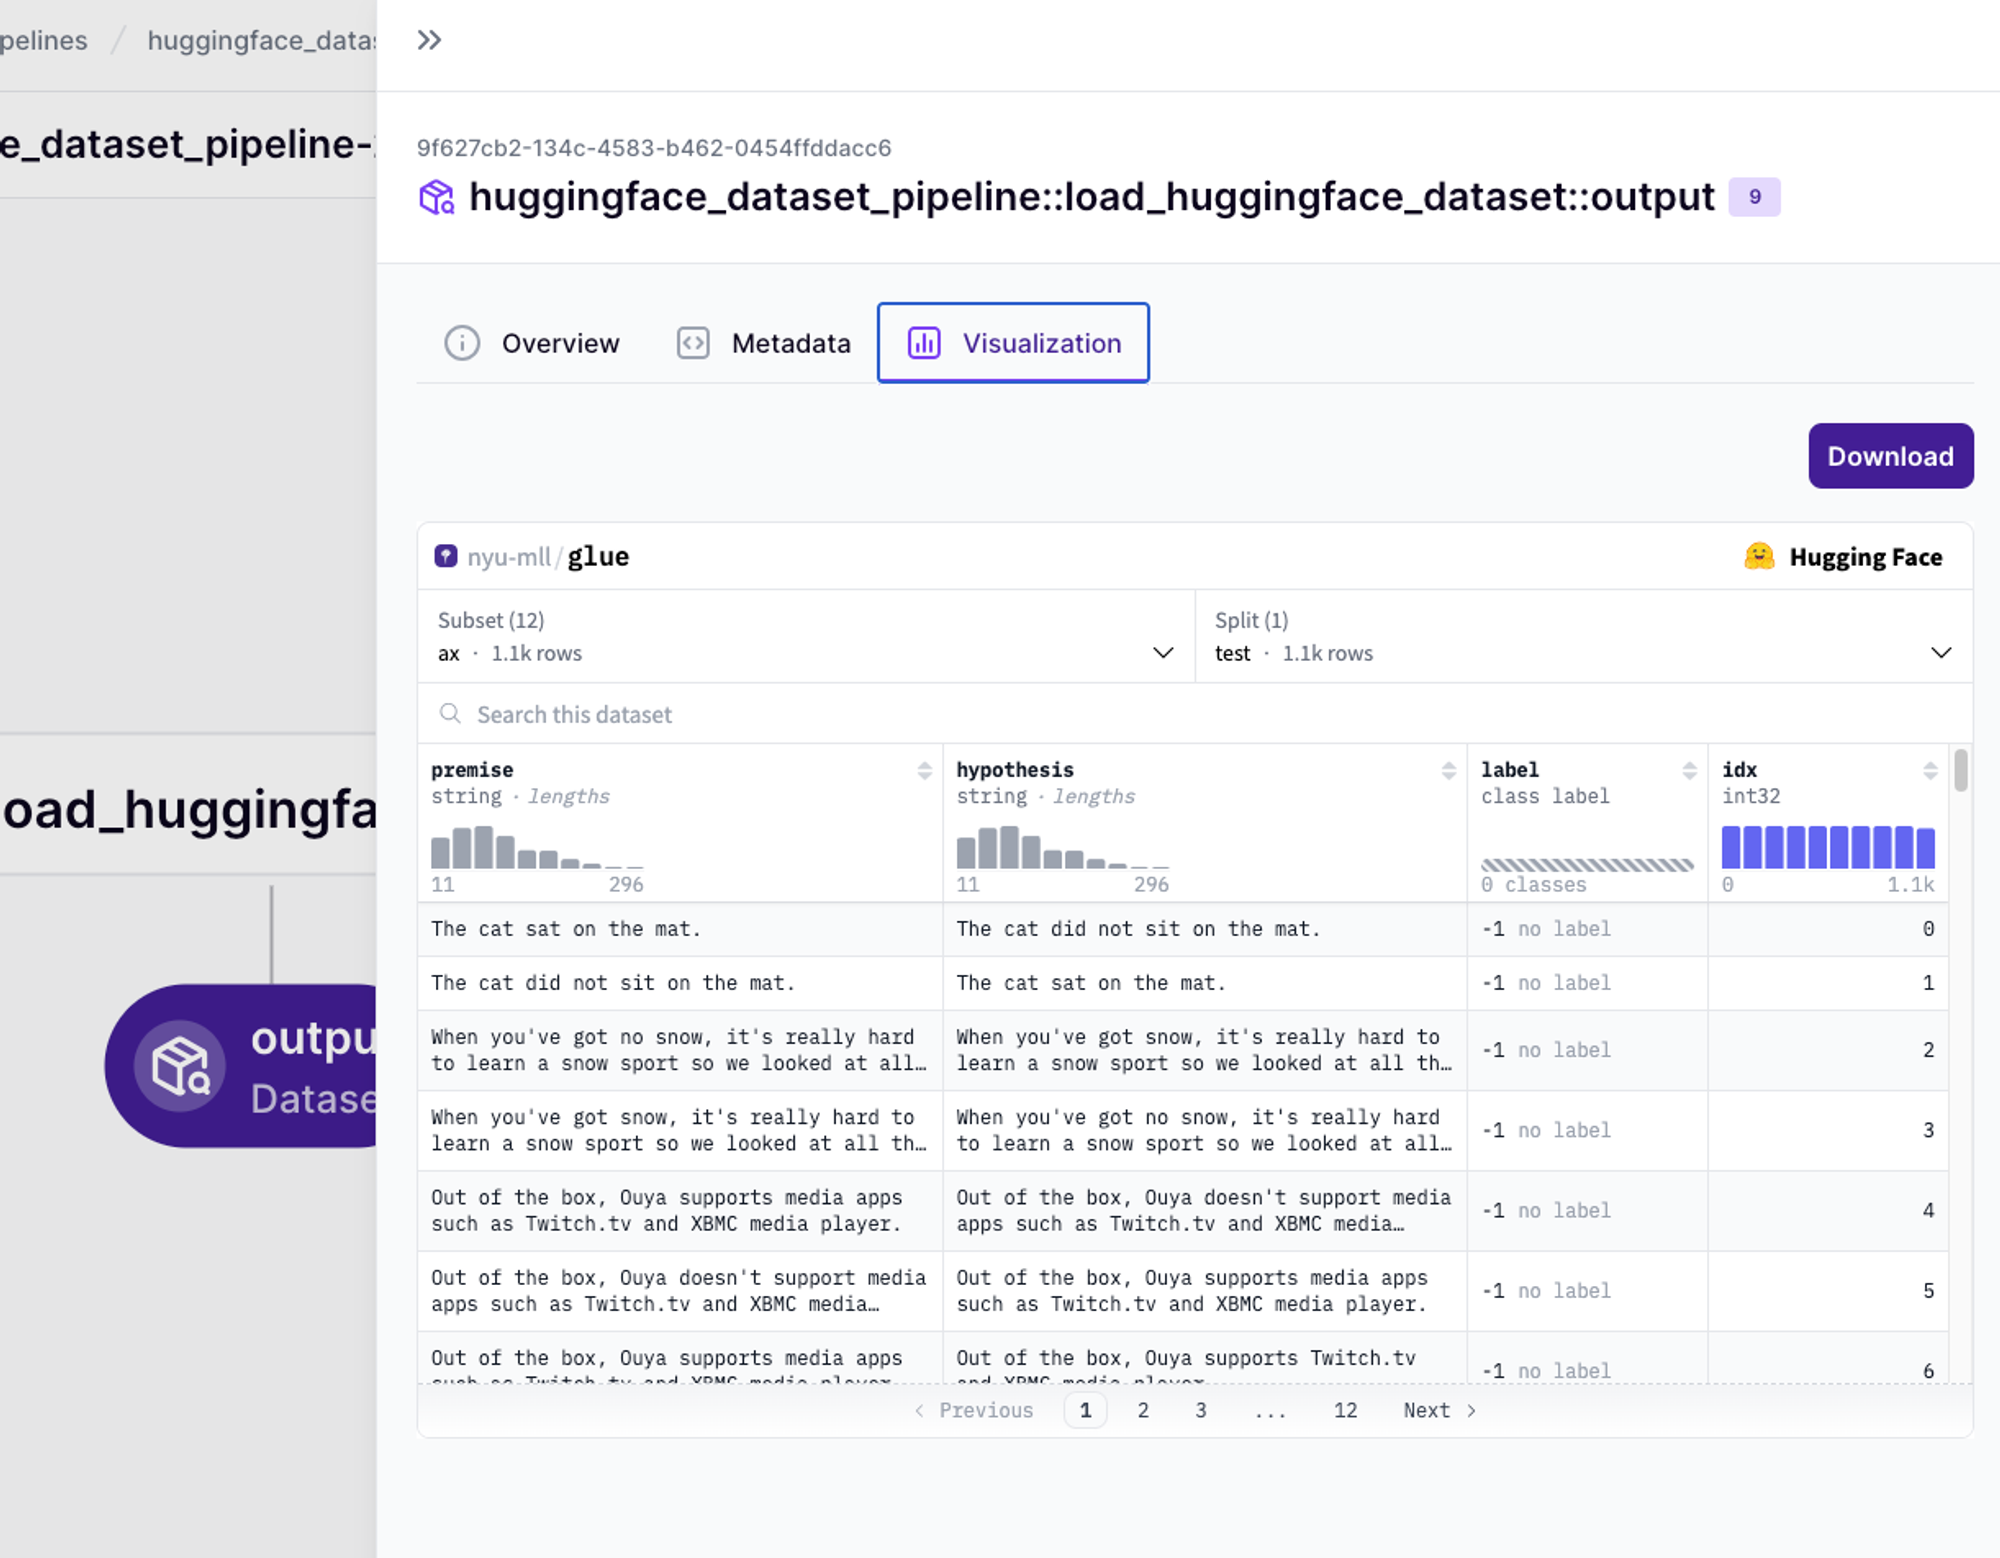
Adding visualizations is also a way to make your experiments more reproducible and to make your results more accessible. Our documentation shows the different kinds of custom visualizations that you can create, but there are many visualizations that happen by default (i.e. automatically) when you return certain types from your steps. Custom visualizations give you flexibility to create exactly the visualizations that you need and they’re all stored in the Dashboard for you to inspect. You can even directly visualize assets like Hugging Face datasets.
These inbuilt ZenML features will give you confidence in your iteration. Changing code and data and parameters is easy to do, but you need to be able to quickly reproduce those experiments without hassle. ZenML makes this easy for you and allows you to experiment without needing to fear that you’ll break something or turn your pipeline into a state which is hard to reproduce.
Speeding up Iteration when working with Large Language Models (LLMs)
It’s still possible to think of fast iteration when working with LLMs even though the assets involved are considerably larger than for other types of models. Many of the same principles outlined above still apply: get your code running end-to-end, use caching, parameterise your steps and visualise your results. In particular, the trick of using smaller models and slices of data often works well for LLMs as well.
For example, if you’re finetuning one of the Llama-class of models from Meta, you could iterate first on TinyLlama (a much smaller version) using only one or two epochs and then switch to the full Llama model when you were sure that your code all works correctly and your experiment is behaving how you’d like it to. Libraries like axolotl already come with pre-made configs for TinyLlama so this shouldn’t be hard to implement!
You’ll also want to leverage all the tricks of the trade like PEFT finetuning, libraries like accelerate and axolotl (or unsloth if that’s your thing) and so on.
The process of iteration around finetuning LLMs usually revolves more around iterating on the data that you want to input into the model more than the actual training step or the model architecture. For this reason, you could even consider separating the workflows into separate pipelines: one for the data preprocessing and ingestion (potentially including things like validation, annotation and/or even synthetic data generation) and one for the actual finetuning. The data work can most likely be done locally and then, when ready for the finetuning step, you can use the outputs of the data preparation pipeline as inputs for the finetuning pipeline.
Growing robustness through experimentation
In summary, iterating fast on ML projects with ZenML involves:
- Getting your code running end-to-end quickly, even if using dummy data/logic at first
- Leveraging ZenML's inbuilt caching and modular pipelines to speed up iterations
- Using a
run.pyfile to easily switch between fast local runs and full production runs - Parameterizing your pipelines for flexibility without code changes
- Taking advantage of ZenML's automatic artifact tracking, versioning and visualization
By following these practices, you can rapidly experiment while maintaining reproducibility. Start with a simple working pipeline, then progressively optimize and scale.
If you’ve successfully written code that works end to end, and you’ve been through a few cycles of iteration where you can start to see improvements in performance, this is the point at which you will probably want to start working on building in robustness. The exact steps for this will depend on the places where this is needed.
For example, if you’re working as a team and finding that the thing holding you back from quickly iterating on your pipelines is that you don’t have a shared place where data is shared and stored, you might want to consider using a feature store. If you’re finding that you need to run things on a schedule, then feel free to set that up with ZenML, and so on. The key is to let your experiences during the iteration phase guide you to the areas that need reinforcement.
Ultimately, ZenML empowers you to grow your ML projects organically. Its automation of tedious MLOps tasks frees you to focus on the real work - uncovering new insights and shipping better models, faster.