On this page
Running a machine learning pipeline on a cloud provider can be tricky — a data scientist needs to package their code into a portable format and deploy it using some orchestration service — whether bare metal VMs, Kubernetes, or even a managed container service.
ZenML solves this with our fundamental stack concept. Put simply, a stack is the configuration of the infrastructure and tooling that defines where and how a pipeline executes. Let’s take a simple example. Here is a simple pipeline in ZenML:
@step
def a_loading_data_step() -> pd.Dataframe:
    return load_data()

@step
def a_training_step(df: pd.Dataframe):
    train_model(df)

@pipeline
def training_pipeline():
    df = a_loading_data_step()
    some_training_logic(df)
If a user saved this in a file called run.py, did pip install zenml, and ran python run.py, this pipeline would execute on a so-called default stack. The default stack consists of two components:
- The local
orchestrator: Each step is run locally in the same environment as the runner script. - The local
artifact store: Each step produces artifacts that are stored on the local filesystem.
☁️ The challenges of a remote (cloud) stack
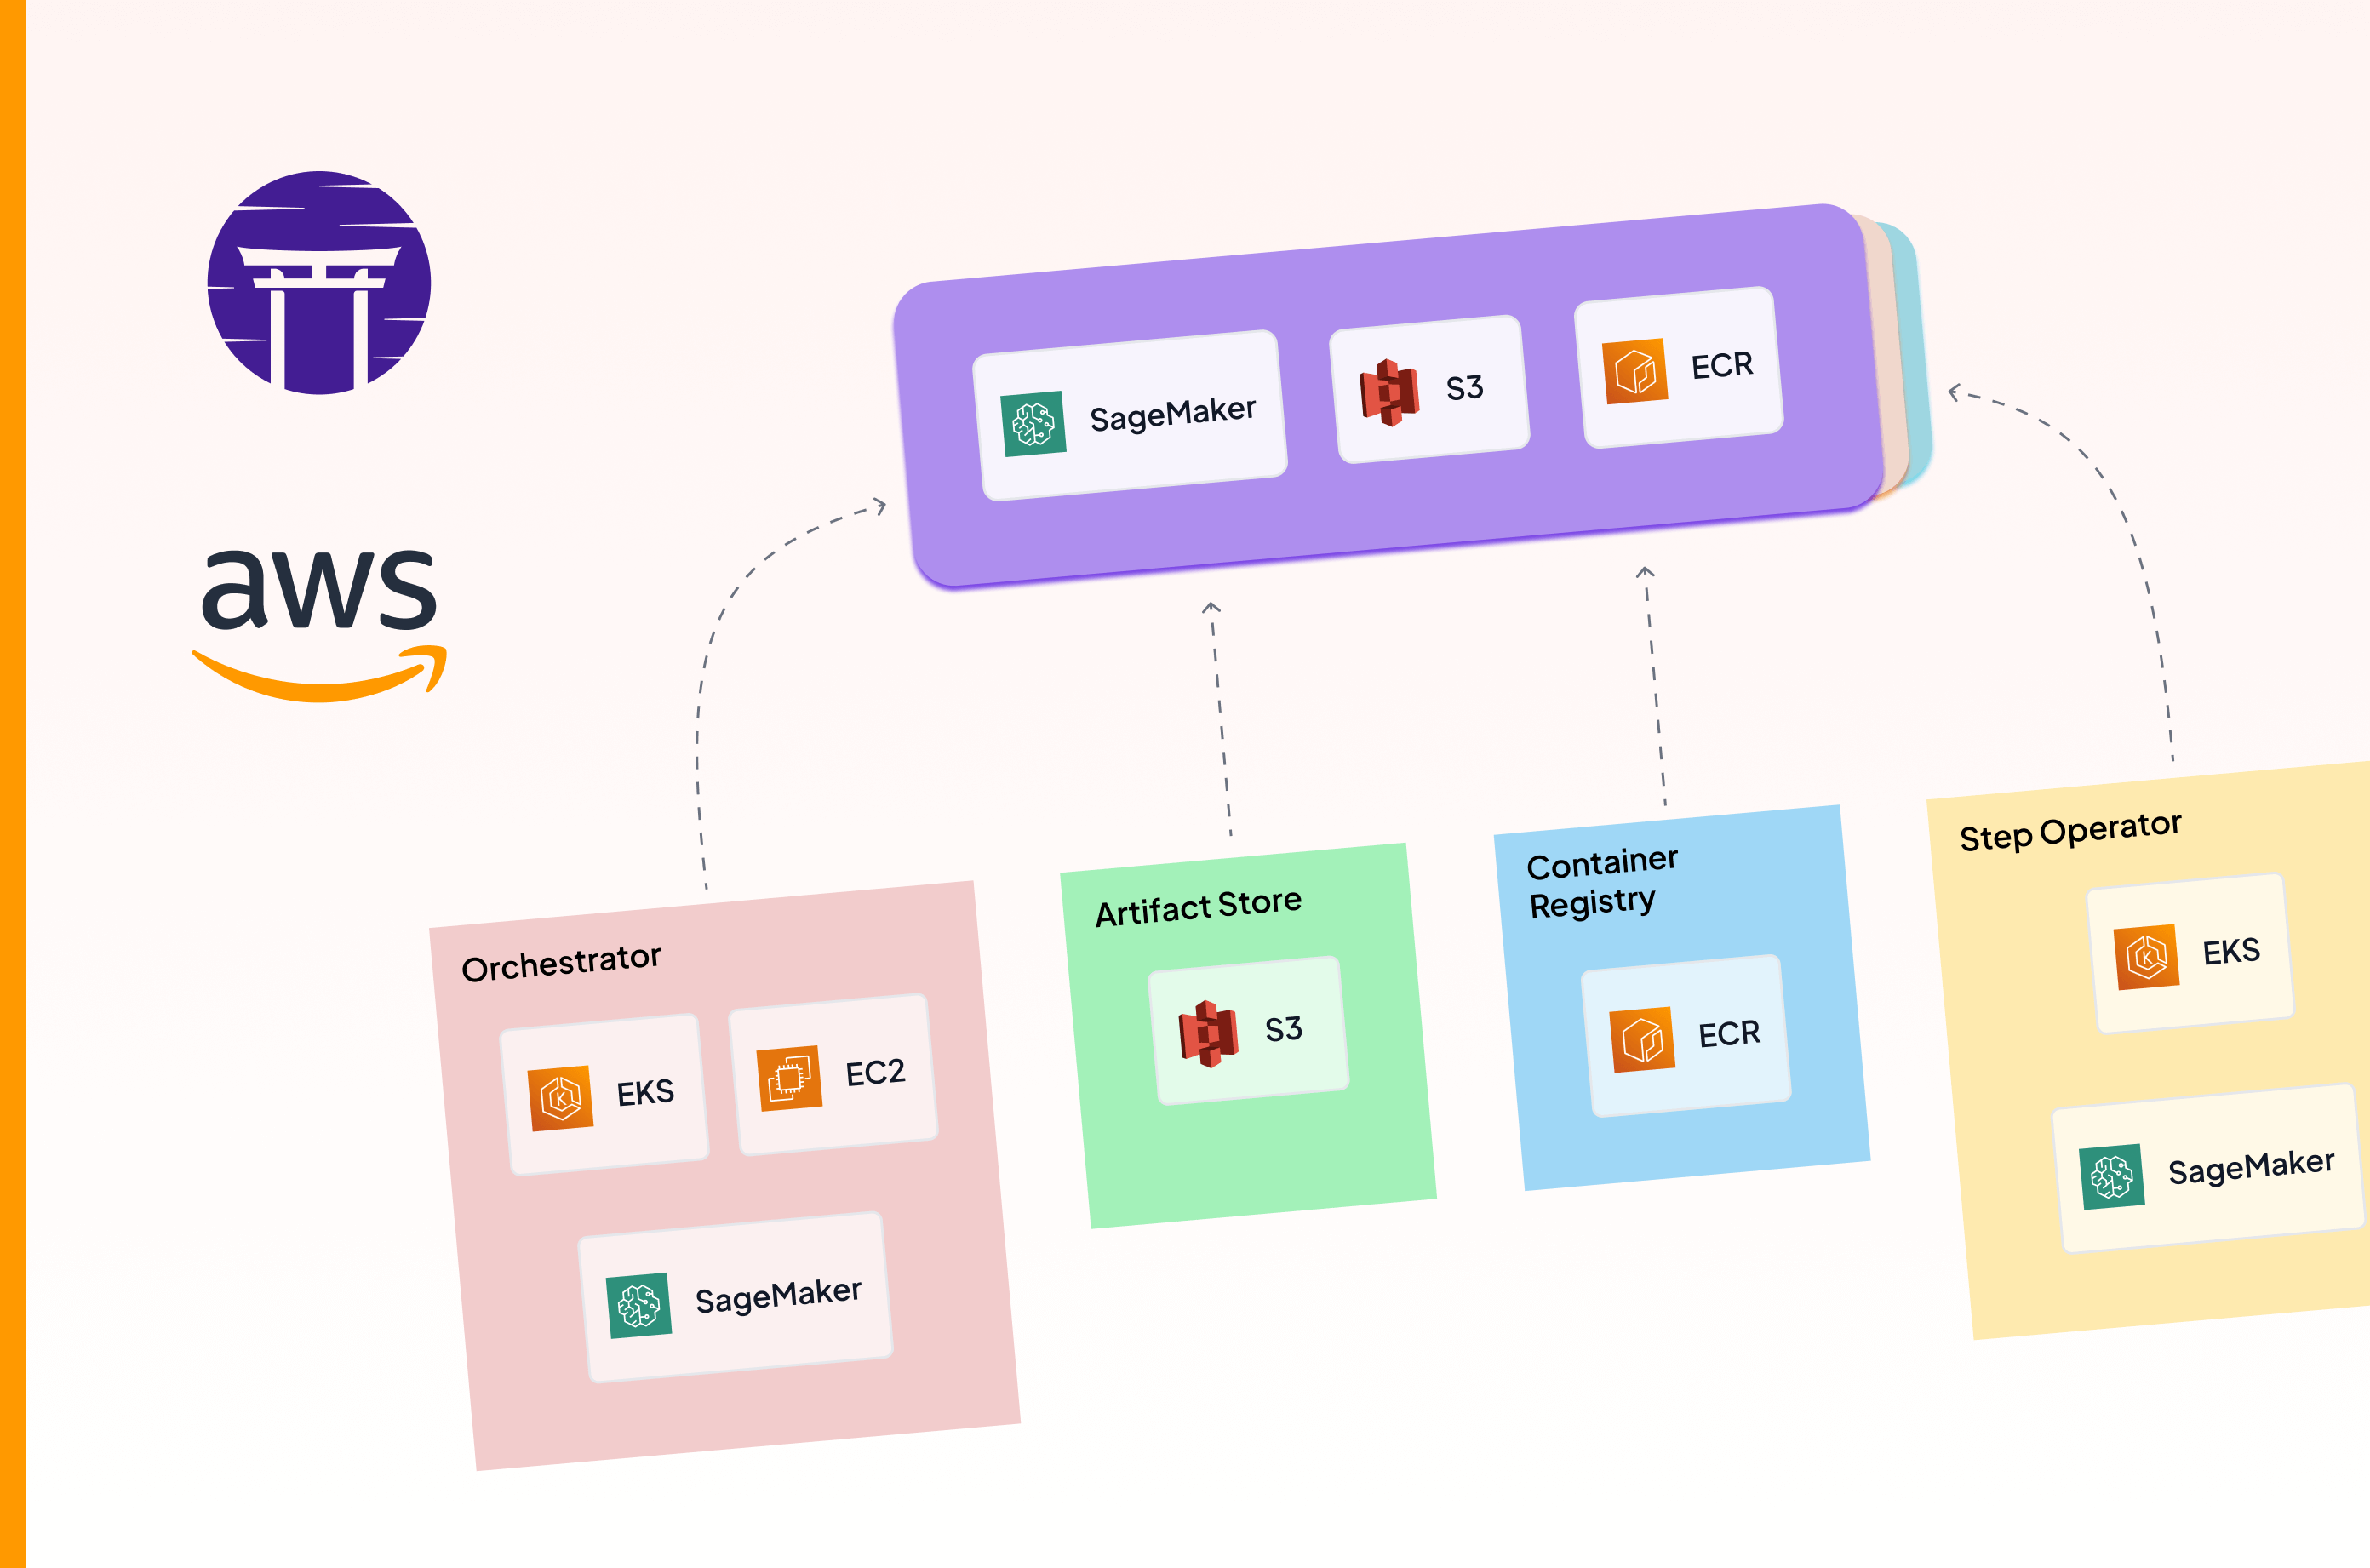
If you wanted to run this pipeline remotely (let’s say on your AWS account), you’d need to change the orchestrator to be one of the supported AWS orchestrators with ZenML (let’s say the AWS Sagemaker orchestrator), and the artifact store to be a S3 bucket. Additionally, you’d need to add an AWS ECR container registry to your stack, so that ZenML can package your code into a docker image, push it to the registry, and execute the Sagemaker job.
In principle, this is a few lines of CLI code with ZenML (We even have a guide for this here). However, we heard again and again from our community that this was one of the most difficult parts of the journey in the ZenML experience.
- Registration is a multi-faceted process, with the service connector registration followed by stack components, and finally the stacks themselves.
- Along the way, things tend to fail, largely with local CLI setups and cloud permissions.
- It can be overwhelming to dive into cloud concepts, especially for teams who do not have the necessary resources/time in-house.
So this month, we sat down and crafted out some features to solve it. The result is two big new additions to the ZenML product - and today we’re going to talk about the first one: 1-click cloud stack deployments.
🚢 1-click Stack Deployments
This feature is for users who do not have existing infrastructure features. Here is how it works:
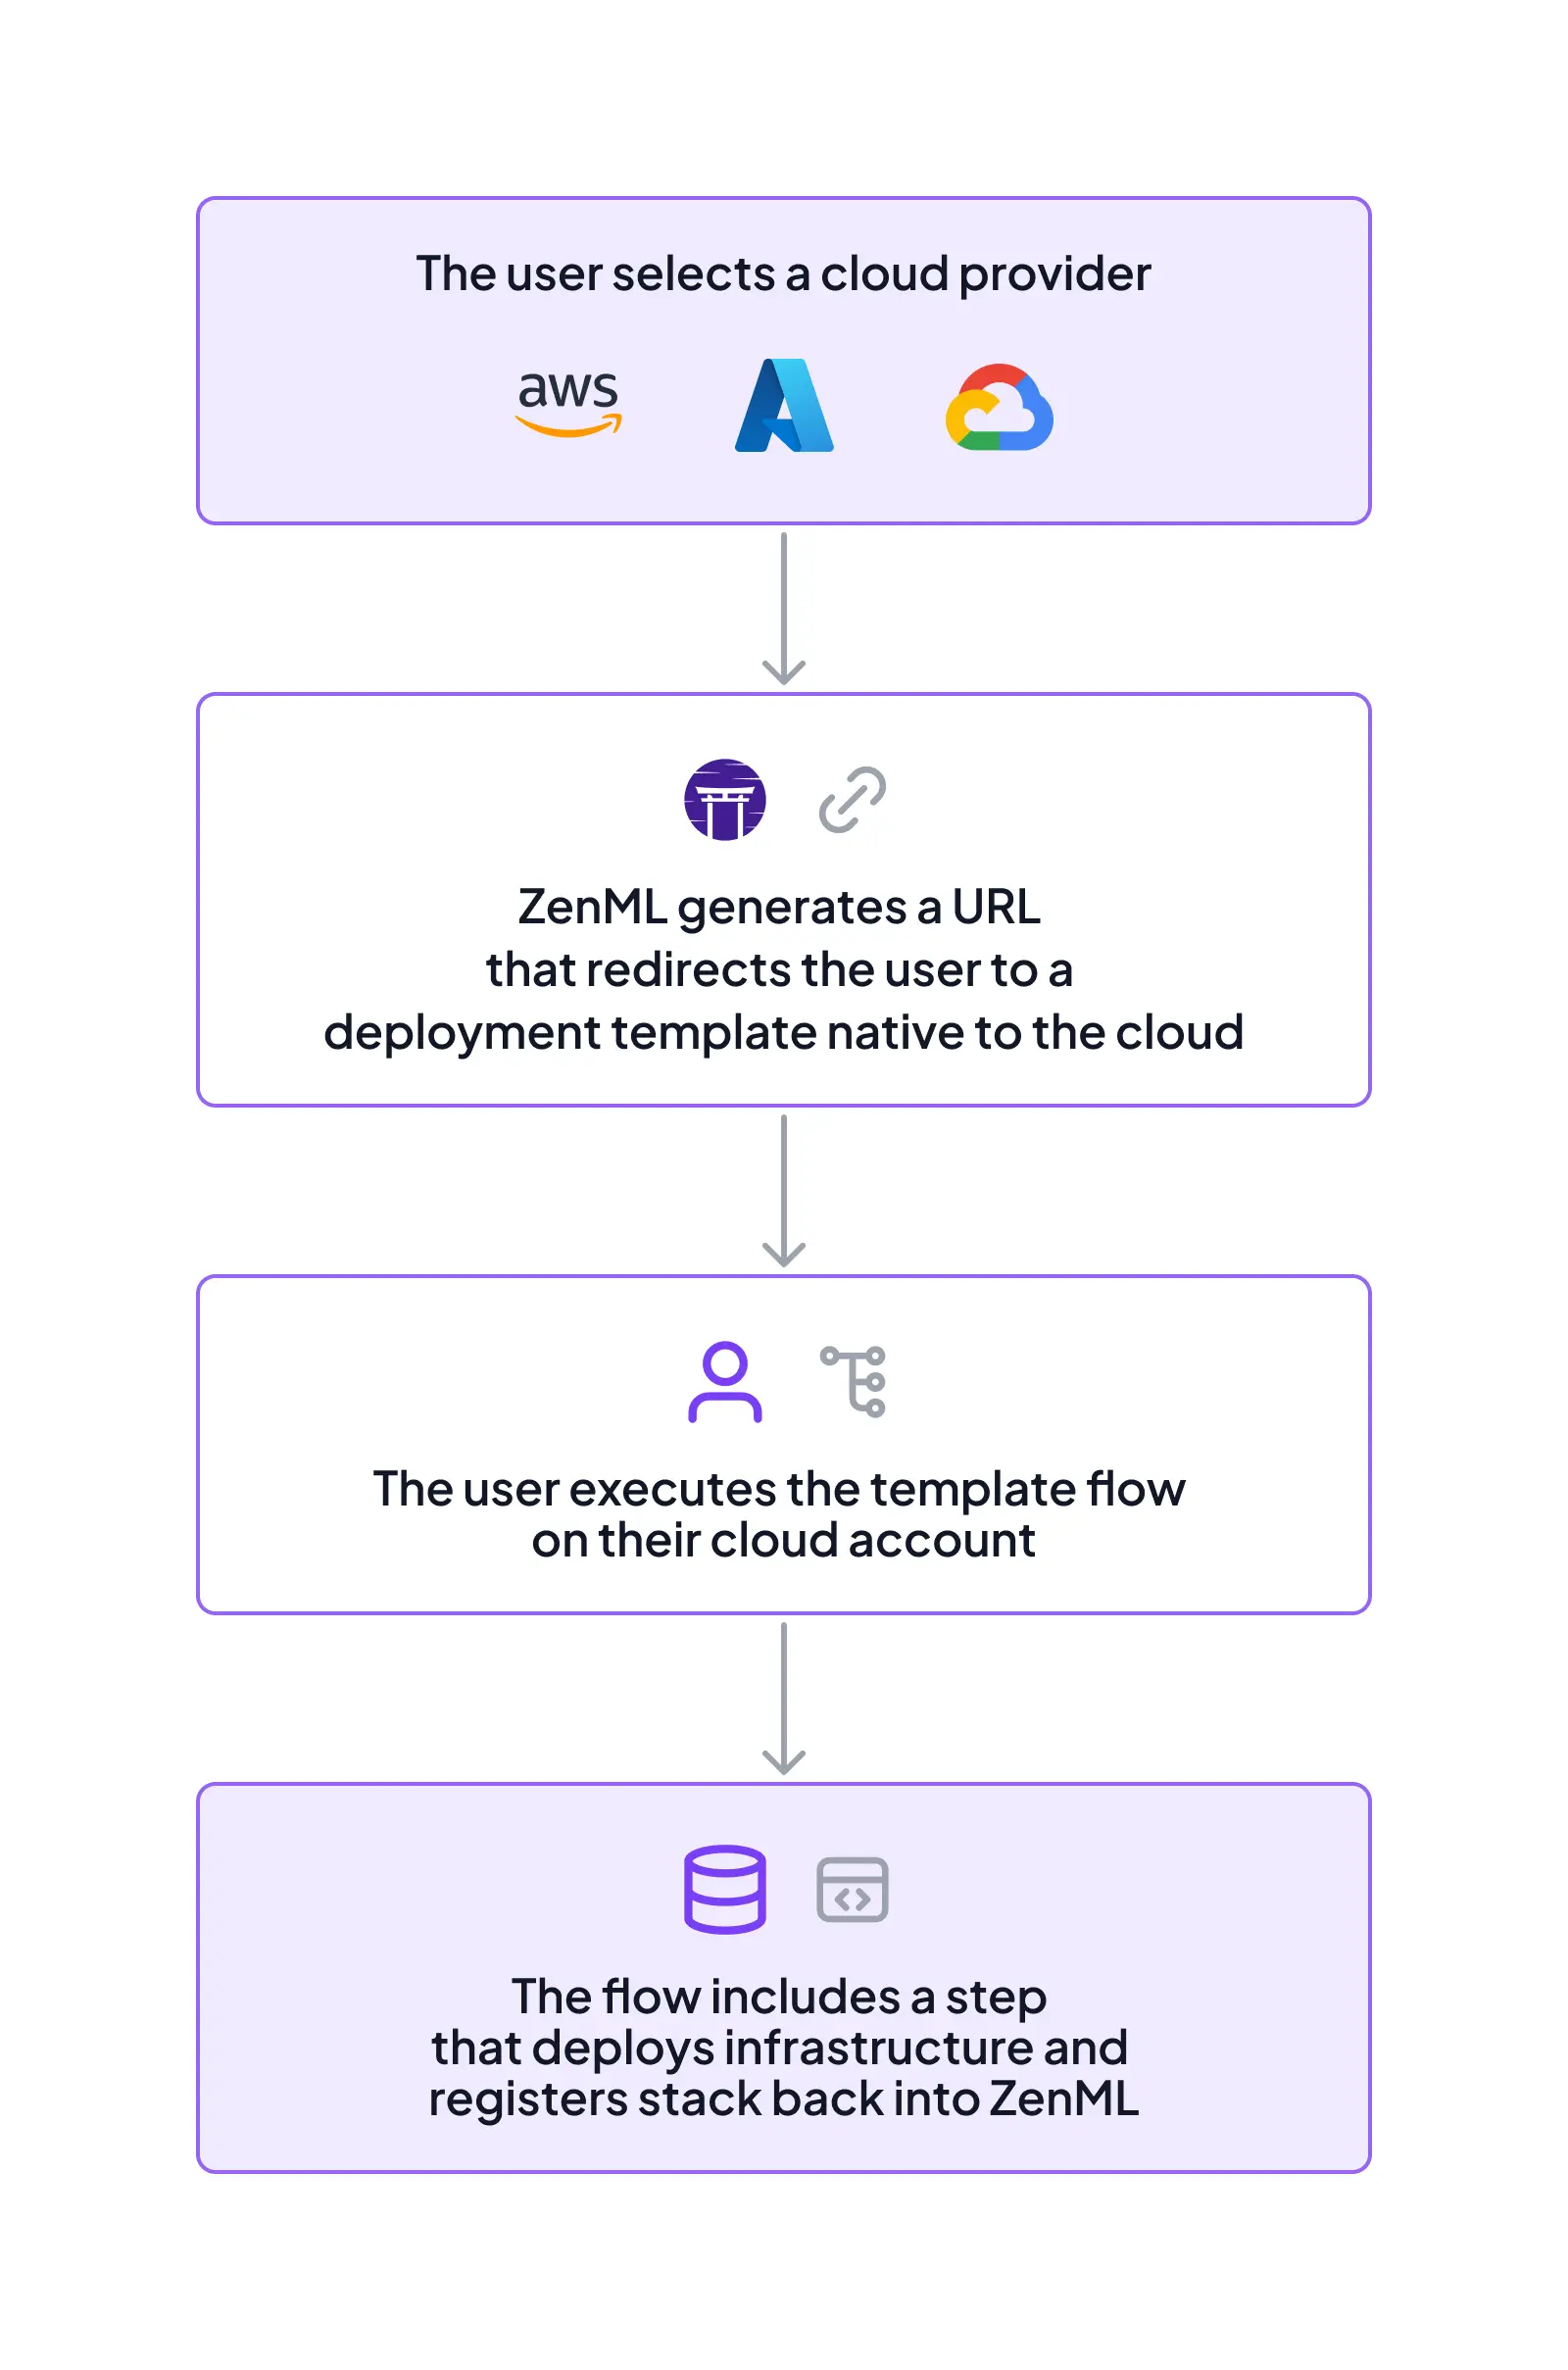
The cool thing about this feature is that it uses native cloud technologies (like AWS Cloudformation) to give users a more controlled experience in their cloud accounts. We’ve also tried our best to make sure that the user is aware of what exactly is provisioned on their account along the way.
How to use it
📢 Note that this feature is only available in a deployed version of ZenML (not in a local scenario via zenml up). Learn how to deploy ZenML here.
To deploy a stack with the 1-click Stack Deployment, you can deploy and connect to ZenML, and then use:
> zenml stack deploy -p awsThis will launch a CLI flow that will guide you through registering a stack.
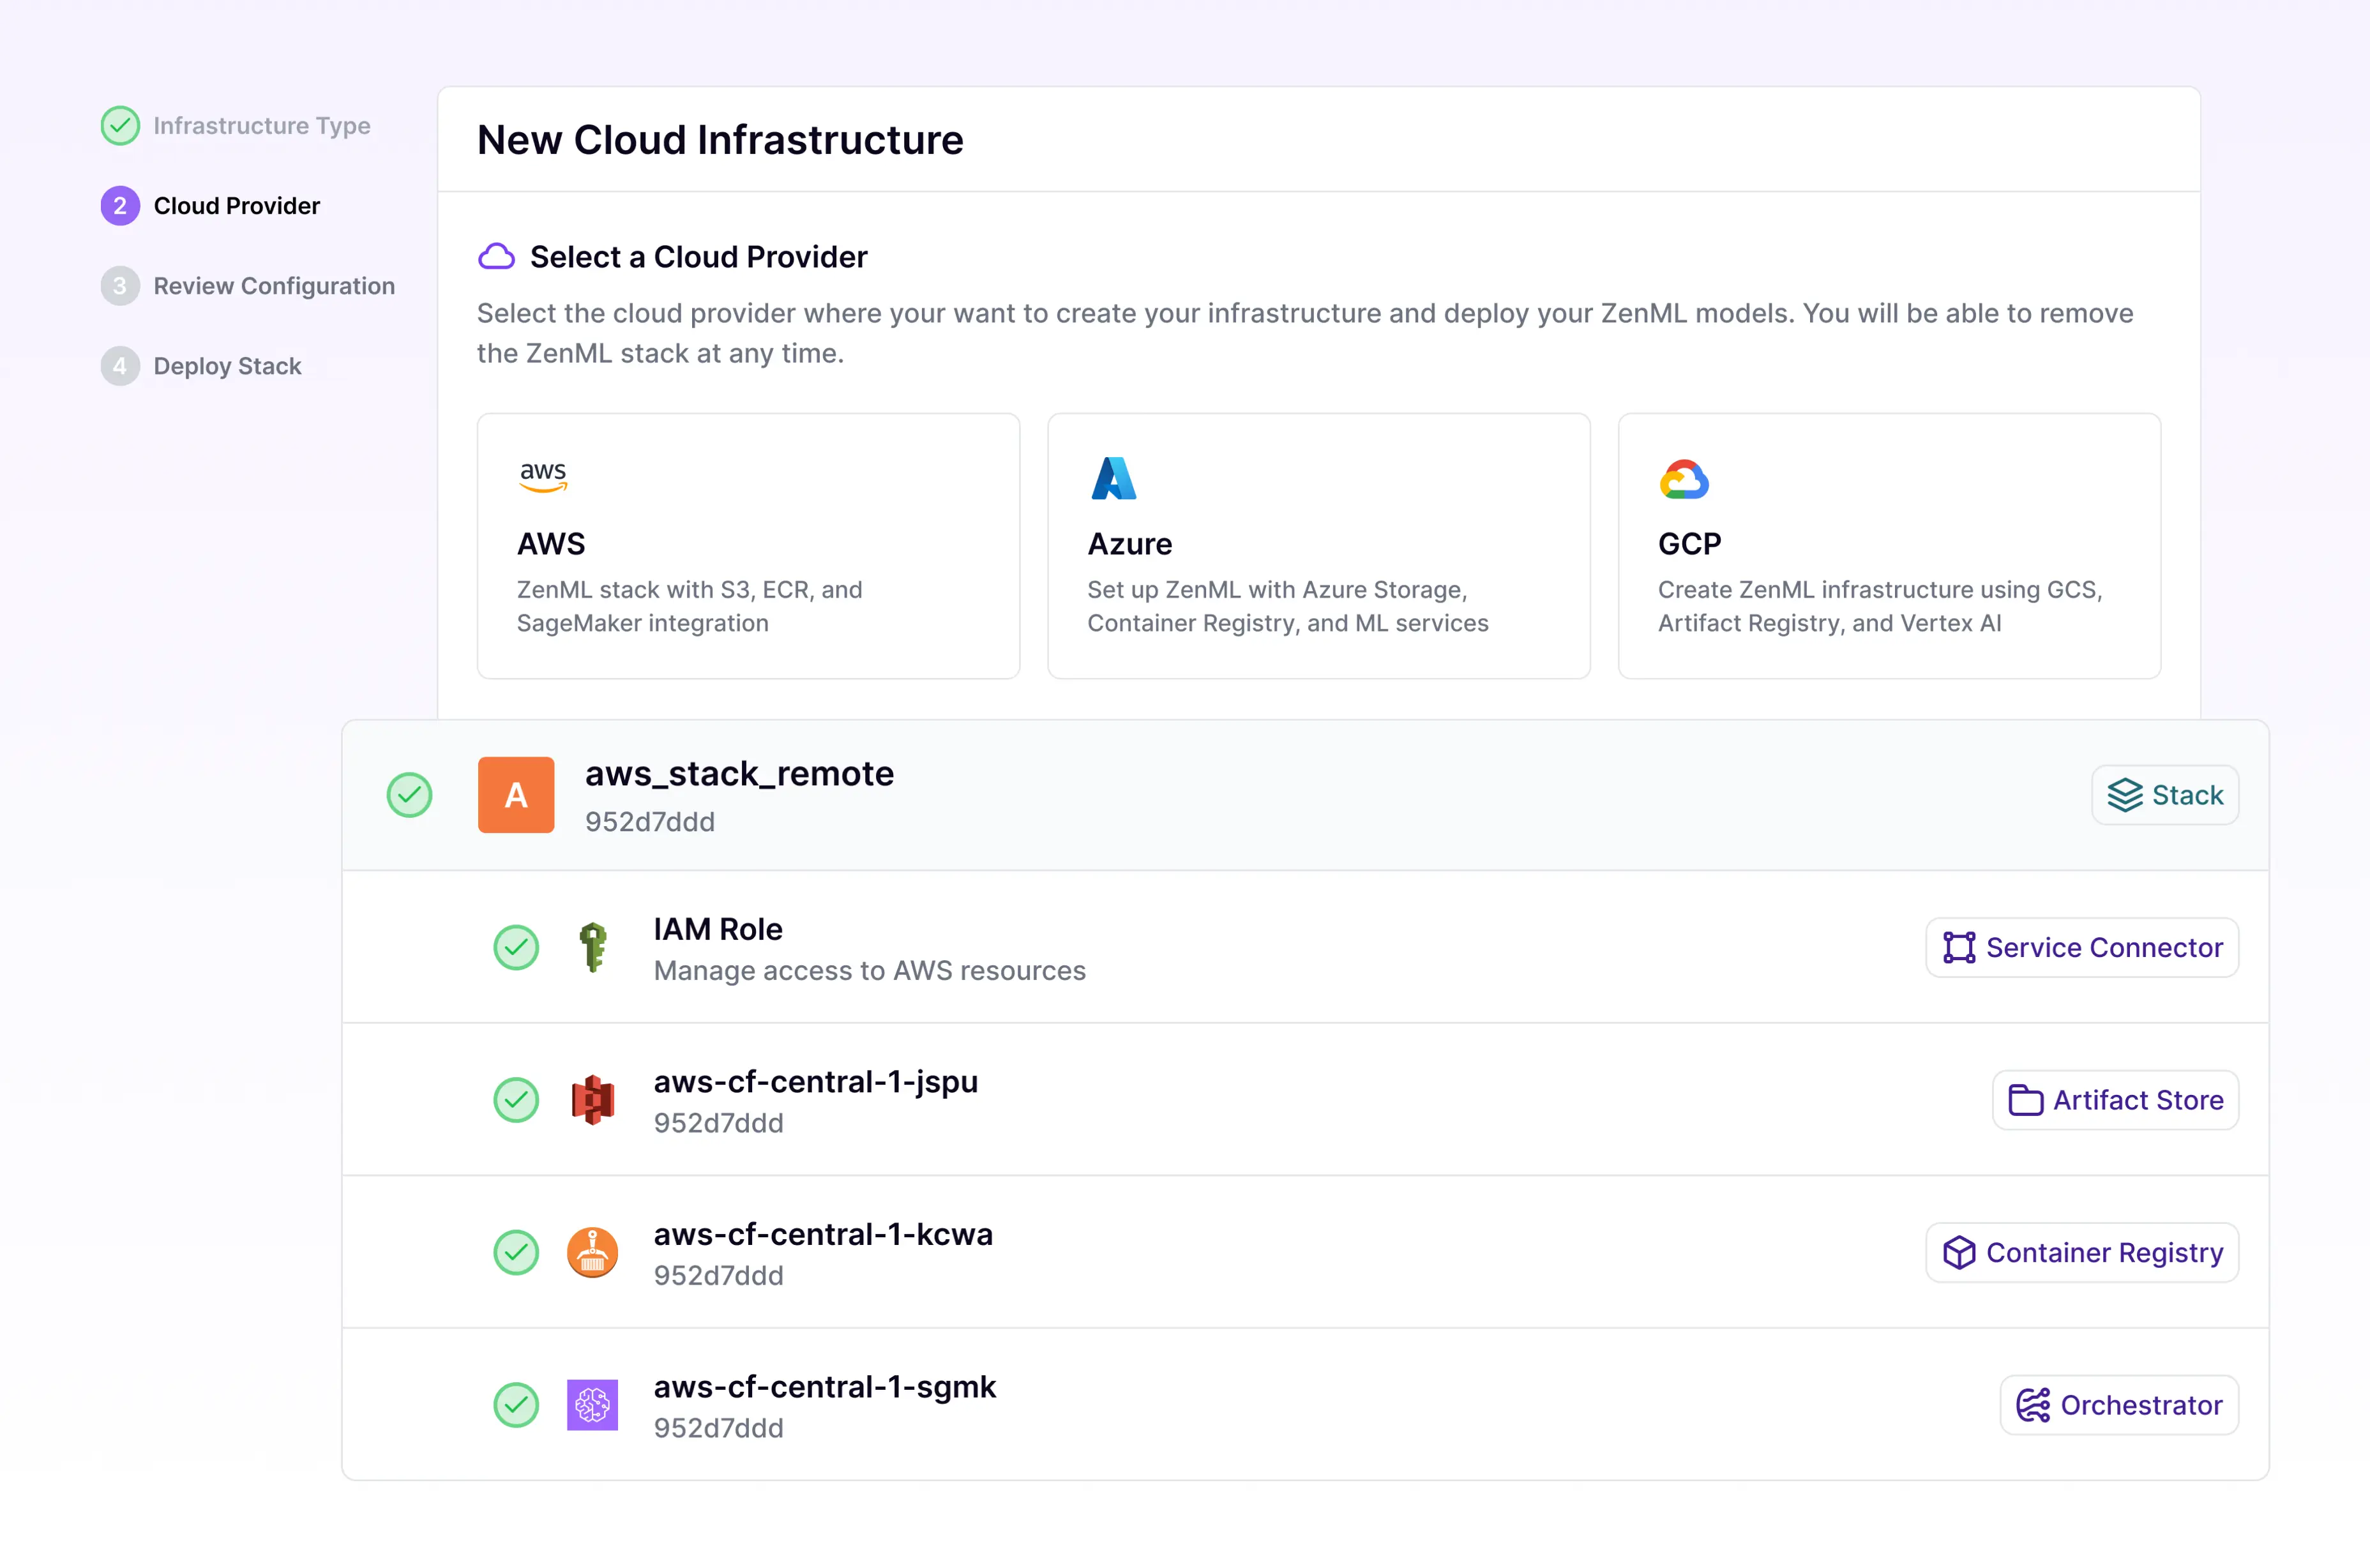
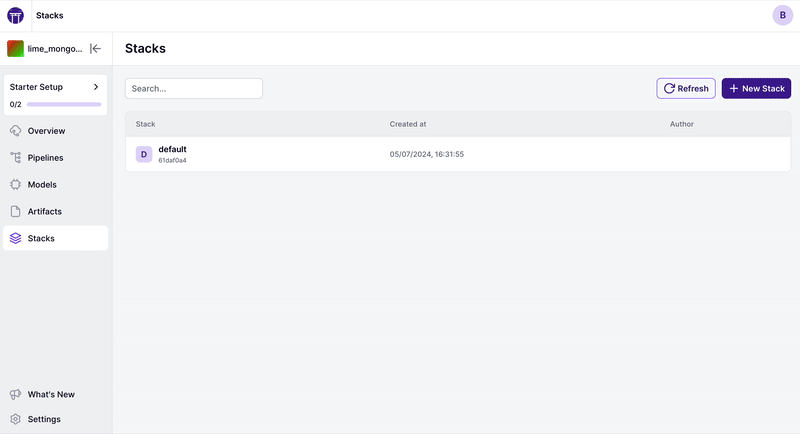
If you’d rather go via the dashboard, you can do by clicking on the Stacks section and creating a new stack, and then clicking on “Create Stack”:
⚠️ We’ve deprecated the old zenml stack deploy command that used mlstacks as a backend and replaced it with this more native cloud implementation. To use mlstacks, you can do so directly.
📺 See it in action
Here is @Baris Can Durak recording a 2-minute video showcasing the new feature in action:
🤸What’s next?
Hopefully, this feature will make life a lot easier for new and existing users of ZenML. For now, we’ve shipped support for AWS, but GCP and Azure should soon follow suit. If you’d like even more stack options, just let us know on Slack so we can prioritize.
Oh, and if you already have cloud resources and want to re-use them, don’t worry. We got you covered! Stay tuned for part 2 of this series.
🦫 Try it now
Try these features today! In order to get access, simply update to the 0.61.0 version:
pip install zenml>=0.61.0The full docs are available here.
As always, feedback is appreciated. Much love from the ZenML team and hope you like these new features!
❓FAQ
What is an MLOps pipeline and how does ZenML help create one?
An MLOps pipeline is an end-to-end workflow that orchestrates the steps involved in building, deploying, and monitoring machine learning models. ZenML provides an ML platform that makes it easy to define MLOps pipelines using Python and deploy them to various cloud services like AWS and GCP with just a few clicks, as described above.
How can ZenML’s 1-click cloud stack deployments accelerate ML platform setup?
Setting up the infrastructure for a machine learning platform can be complex and time-consuming, especially when dealing with cloud providers. ZenML’s 1-click cloud stack deployments simplify this by automatically provisioning the necessary resources and registering the stack components back in ZenML. This allows data science teams to quickly set up an MLOps pipeline without worrying about the underlying infrastructure.
Does ZenML support both AWS MLOps and GCP MLOps pipelines?
Yes, ZenML provides a cloud-agnostic MLOps platform that allows you to easily deploy and run ML pipelines on both AWS and GCP infrastructure. With ZenML, you can define your pipeline once and then deploy it to your cloud provider of choice with minimal configuration. Support for Azure is also planned for the near future.