


Microsoft released their Phi 3.5 series of models yesterday. The three new models included a better mini model (with multilingual support), a new Mixture of Experts (MoE) model, and a new vision model supporting multiple images. The Phi 3 models in general are best known for:
- Great performance for their size
- Ideal for use on-device
- Trained on high-quality data, with a synthetic textbook-style flavor
- Strong instruction tuning (they don't get released as base models)
If we look at the some of the more general benchmarks, you can see strong performance against models even in a bigger class. Here we see it outperforming the much larger Mistral-7B and Llama3.1-8B models:

Perhaps most interesting and impressive are the improvements in multilingual support, as shown in this specific language-by-language comparison:

There are lots of places where it might make sense to finetune your own open-source or open-weights model:
- you might have a need for structured data extraction
- you might want to include custom tool use as part of your LLM implementation and just using an instruct-tuned model isn’t giving the results you’re hoping for
- you want to break the dependency on OpenAI’s closed-source proprietary models
- you have sensitive customer data that you are legally or ethically bound to protect
For all these reasons and more, you might want to give finetuning the new Phi 3.5 model a go. This tutorial will guide you through the process of getting set up with both ZenML and running a finetuning pipeline on cloud infrastructure. Specifically we will:
- 🚜 load and preprocess a dataset for finetuning
- 👁️ evaluate the model using … as a base model to get a baseline
- 🚀 finetune the model
- 👀 evaluate it after finetuning to see how it improved
- ✅ if it meets our criteria it’ll be promoted to
Stagingin the Model Control Plane…
Let’s dive into the details!
Setup
📢 Note that this feature is only available in a deployed version of ZenML (notin a local scenario via `zenml up`). Learnhow to deploy ZenML here.
We offer a free two-week trial of ZenML Pro and you’ll find that’s the easiest way to get started. Get an account if you don’t already have one.
Depending on when you read this and where you're located, the model might be gated on the Hugging Face official repository so you’ll possibly need to request access to the model. If you have an account this is easy to do and it seems that they’re granting access fairly quickly (within 24 hours). While you’re on the Hugging Face site you’ll also want to get a Hugging Face read token. (See the Hugging Face user access token docs for more on this).
To follow along and finetune your model on GCP, you’ll need a GCP stack, but of course you can also just run this using the default stack by using the phi3.5_finetune_local.yaml file instead of the ...remote.yaml file.
Your GCP stack will be made up of:
- a container registry on GCP
- an artifact store on GCP
- a step operator that uses VertexAI, setup to run on GPU-accelerated hardware
- a local / default orchestrator (you could also use VertexAI as your orchestrator)
Before we're able to run any pipeline, we need to set up our environment as follows:
You'll want to follow the instructions on your ZenML dashboard to connect to your server through the terminal. The command will look something like this and you’ll find it on the main overview screen:
Setting all the infrastructure and permissions up for these components is a bit of a pain, so ZenML has an almost-one-click way to handle this for you. Simply type:
This will guide you through a process in which you deploy the infrastructure within GCP.

💡 PRO TIP: When selecting the region in which you want this to be deployed, consider choosing `us-central1` since this has (or at least seems to have!) a greater availability of A100 machines and so the step is unlikely to fail on account of unavailable resources
The basic GCP stack that gets deployed in the previous step needs a bit of work before we can use it for finetuning. We’ll swap out the VertexAI orchestrator for a step operator, since we only want certain steps to run on the more-costly GPU-backed hardware. To make the necessary changes, run the following commands (assuming you set the name of the stack as phi35):
Once you’re done setting up the stack, you should register the Hugging Face read token (that you obtained above) as a secret so that the cloud machines can get access to the Phi model via the Hugging Face Hub. Registering a secret is easy:
Everything's ready to go. Let’s get finetuning!
Running the Finetuning Pipeline
To run the pipeline, simply execute the following:
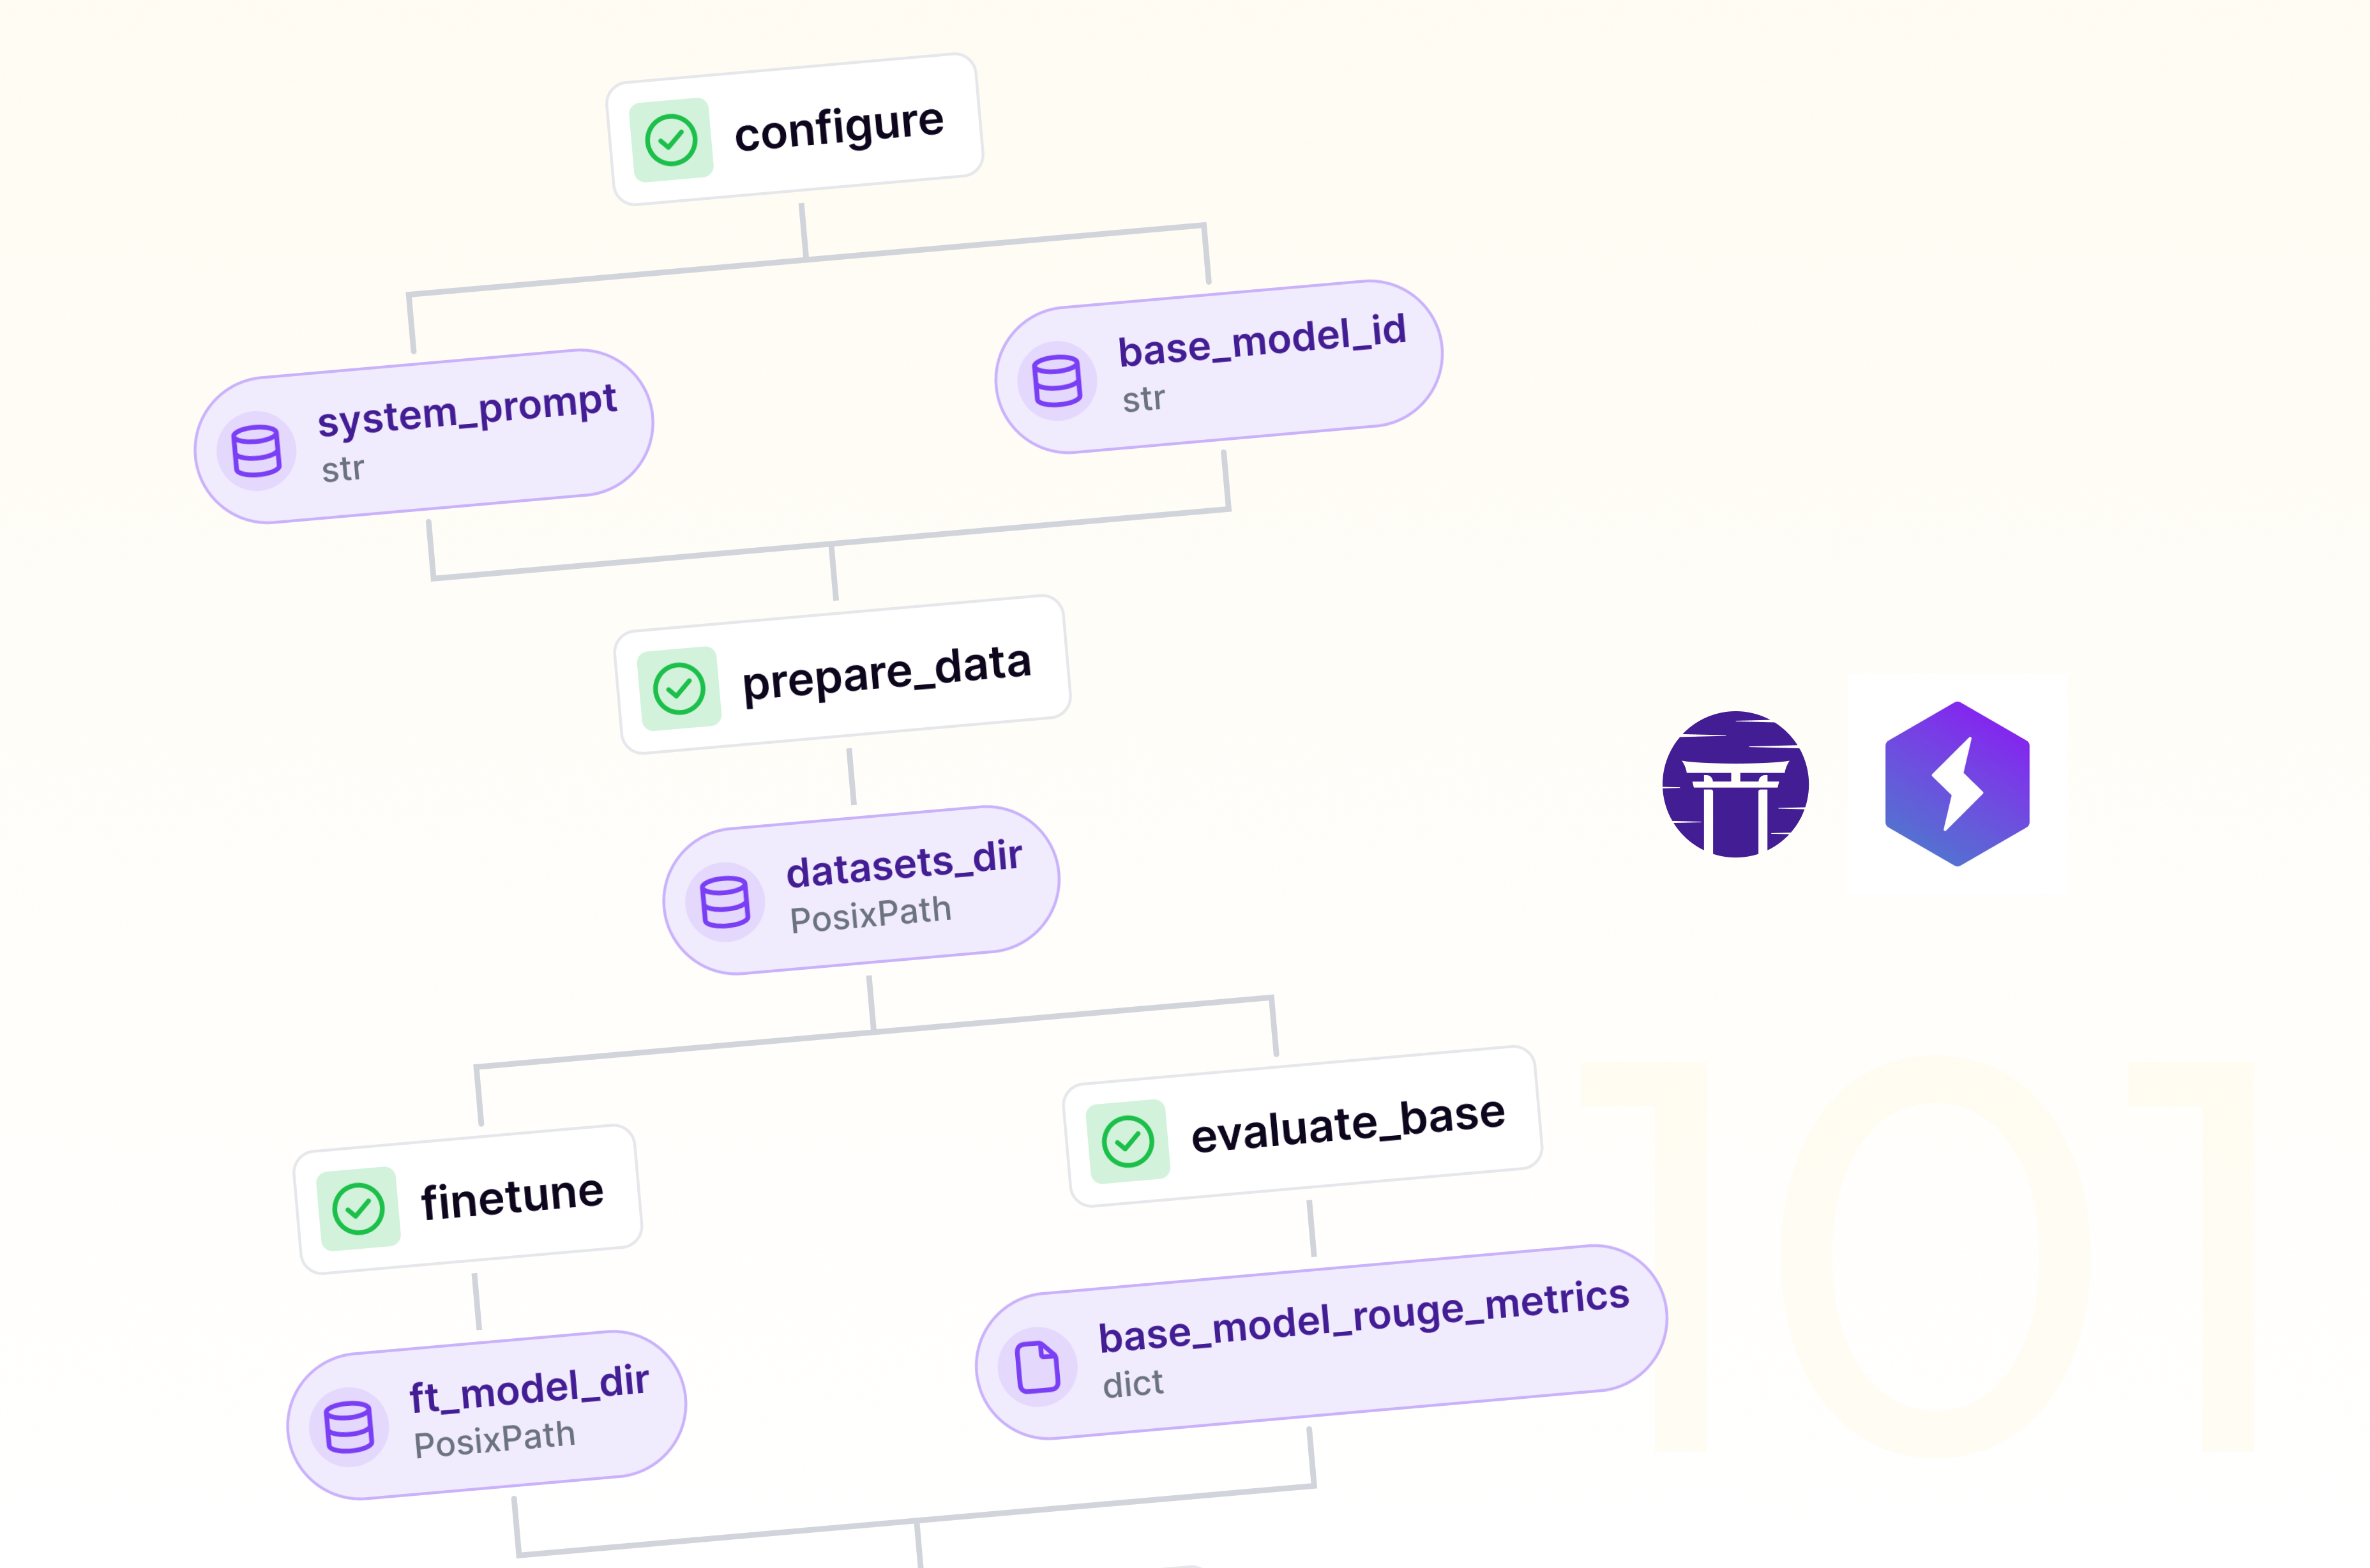
This will start the pipeline and run:
prepare_data- a local data preparation step which downloads the dataset and carries out some preprocessingevaluate_base- (runs on A100) - a baseline evaluation of the raw model using Rouge metricsfinetune- (runs on A100) - finetuning the model using the datasetevaluate_finetuned- (runs on A100) - evaluating the new finetuned model we just created using the same Rouge metricspromote- checks which of the two models performed best. If the finetuned model performed better, then we promote the model to **Staging.**
.png)
If you’re running using the A100 hardware that we set up above, this pipeline should take somewhere between 45 minutes to an hour to run through. Some regions will have a smaller supply of GPU-powered machines so your steps might fail and retry.
Our finetuned model lives in the artifact store now and we can now inspect some of the artifacts and outputs of the pipeline over on the dashboard.
Inspecting our finetuning pipeline in the Dashboard
You can inspect the pipeline run and its artifacts first in the pipeline overview:

Useful metadata about the run is displayed on the right panel and by clicking the ‘Configuration’ tab you’ll see all the parameters used when you ran the pipeline. (These are values set by the YAML config file as well as in the pipeline code itself.
Clicking on an individual step (like here for the finetune step) will allow you to inspect the runtime parameters for that particular piece of the pipeline:

Once you’ve done a few experiments, the place to go for a global overview of your experiments and artifacts is the Model Control Plane. Click the ‘Models’ tab on the left side of the Dashboard and you’ll see something like this:

Note that some of these model versions have been promoted to Production and Staging stages, which is a way of isolating and highlighting particular statuses of your work product. If you were paying attention above, you’ll notice that the model you finetuned actually was promoted to Staging already for you (though you can do it manually in the Dashboard, too). The final step of the pipeline checks whether the finetuned version performs better than the base model (according to the metrics we evaluate) and then if so, we promote it to the next stage. This is a very common pattern in production machine learning and works out of the box with ZenML.
From this point you can click through to a specific version (300_steps for example) and then inspect the artifacts, models, deployments or even metadata surrounding that particular iteration. You can also see all the pipeline runs associated with that particular experiment that you were working on and it’s a way to make sense of all the complexity of your modelling work.

And of course, your model artifacts are all available to any downstream use that you might have via the API or Python SDK.
What can I do now?
Congratulations! You’ve now finetuned an LLM with ZenML! For organisations and businesses with a need for repeated finetuning of models, ZenML gives you an interface and workflow that will simplify these processes. If you want to play around with the code, you might consider:
- switching out the base model to something bigger (or smaller!)
- switching out the dataset to something closer to your use case
- add a deployment step at the end
- perform multiple experiments by tweaking the hyperparameters in the config file and use the Model Control Plane to compare it all
I hope this tutorial has shown you that finetuning LLMs in a production setup built for reproducibility doesn’t have to be hard. If you’re interested in learning more about how ZenML can support your team in your production use cases, please get in touch with us on Slack or sign up for a call where we can discuss how we can help you!