On this page
Introduction to ZenML
The journey from model conception to deployment in machine learning is fraught with infrastructure management challenges. Machine learning engineers often struggle to ensure models function correctly in production without constant supervision. In this blog, we explore how ZenML simplifies these challenges by abstracting the complexities of MLOps, providing reliable deployment environments for machine learning engineers.
What is ZenML?
ZenML is an open-source MLOps framework that creates portable, production-ready machine learning pipelines. It offers extensive integration options, decoupling infrastructure from code to enable seamless development and deployment. This simplification allows machine learning engineers to focus on strategic growth rather than infrastructure headaches. Coupled with Kubeflow, ZenML enhances project adaptability and scalability, providing a streamlined pathway for rapid ML model deployment to production.
In this post, we will learn how to integrate ZenML with Kubeflow to streamline your MLOps pipeline. This integration reduces infrastructure complexity, enabling efficient development, continuous monitoring, and deployment of Machine Learning projects, enhancing business outcomes. ZenML simplifies workflow setup and orchestration, improving productivity and teamwork for machine learning engineers. We will review practical use cases, showing how this integration provides a seamless interface for managing complex ML pipelines ensuring effective business outcomes.
Key Features:
- Pipeline Versioning: ZenML offers robust version control features that guarantee ML processes that are reliable and consistent.
- Integration Flexibility: It supports popular ML frameworks and preferred tools, enabling customized pipeline integration and modification.
- Scalability: Designed to scale smoothly from local environments to extensive cloud deployments like Amazon Web Services (AWS) and Google Cloud, ZenML facilitates resource management across different stages of ML project growth, ensuring seamless integrations and reliable deployment on Google Cloud and AWS Batch.
Role-Specific Benefits:
- MLOps Platform Engineers: ZenML helps configure and manage scalable ML systems, establishing standardized environments for reliable development and deployment on any cloud provider.
- Data Scientists: This technology streamlines the experimentation cycle by allowing data scientists, machine learning engineers, and engineering teams to invent and experiment with models without worrying about managing infrastructure.
- ML Engineers: Enable the smooth management of dependencies and efficiently integrate trustworthy, high-performing models into production environments, ensuring optimal performance and seamless integrations for machine learning engineers supported by robust model architectures.
Run your ML pipelines locally with ZenML
This part will teach you how to quickly set up and use ZenML to run machine learning pipelines locally. We’ll cover all the ground, from installing Python to launching your first pipeline, so that you can maximize machine learning operations. Setting up ZenML helps improve the development pace and refine models for larger-scale deployments. Let’s begin by utilizing ZenML to set up your local ML pipeline.
Install Python
- Download and install the correct Python version if you don’t have it.
- Ensure it's between versions 3.8 and 3.11 for compatibility.
Ensure you have Python installed
python --versionSet up a Virtual Environment
- Creating a virtual environment for your project is good practice to avoid conflicts with other Python software packages.
Creating a Virtual Environment:
python -m venv myenv- To learn more about how to activate Python virtual environments.
Connect to ZenML
pip install zenmlStart the ZenML server locally
zenml up- If you use a Windows device, you must run “zenml --blocking” to start the server in blocking mode, which ensures robust retry mechanisms.
- To connect to your ZenML local, use 'default' as a username and an empty password.
Run your first pipeline
- Clone the quickstart example to your local machine and experience smooth integration with your existing technology stack.
git clone --depth 1 https://github.com/zenml-io/zenml.git && cd zenml/examples/quickstart- Initialize ZenML in the current directory
zenml init- Install the remaining requirements apart from ZenML
pip install -r requirements.txt- Run the model training pipeline.
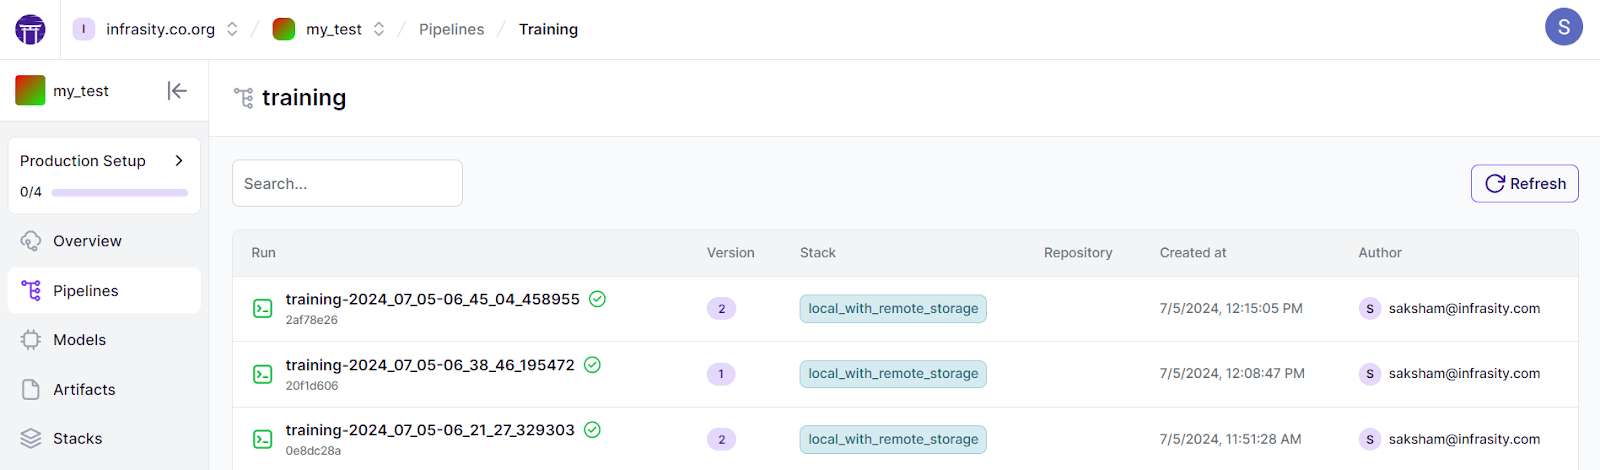
python run.py --training-pipelineOnce it is running, your dashboard will show all the details of the associated run, models, and artifacts.
Transitioning to the cloud - deploying ZenML with ZenML Pro
ZenML Pro is a managed version of the open-source ZenML framework designed for team scalability, role-based access control, and collaboration on platforms like Google Cloud, offering model versions management and enhanced model training for an efficient ML lifecycle. It features a managed control plane, advanced roles and permissions, enhanced observability, advanced monitoring, CI/CD integrations, and a model performance dashboard for efficient ML pipeline management. ZenML Pro provides top-notch security, automatic backups, robust infrastructure, and compliance tools, meeting compliance requirements for a seamless MLOps experience. An alternative to the Pro version is the OSS version, which can be deployed manually.
STEP 1:
Click on the “Try ZenML” button.
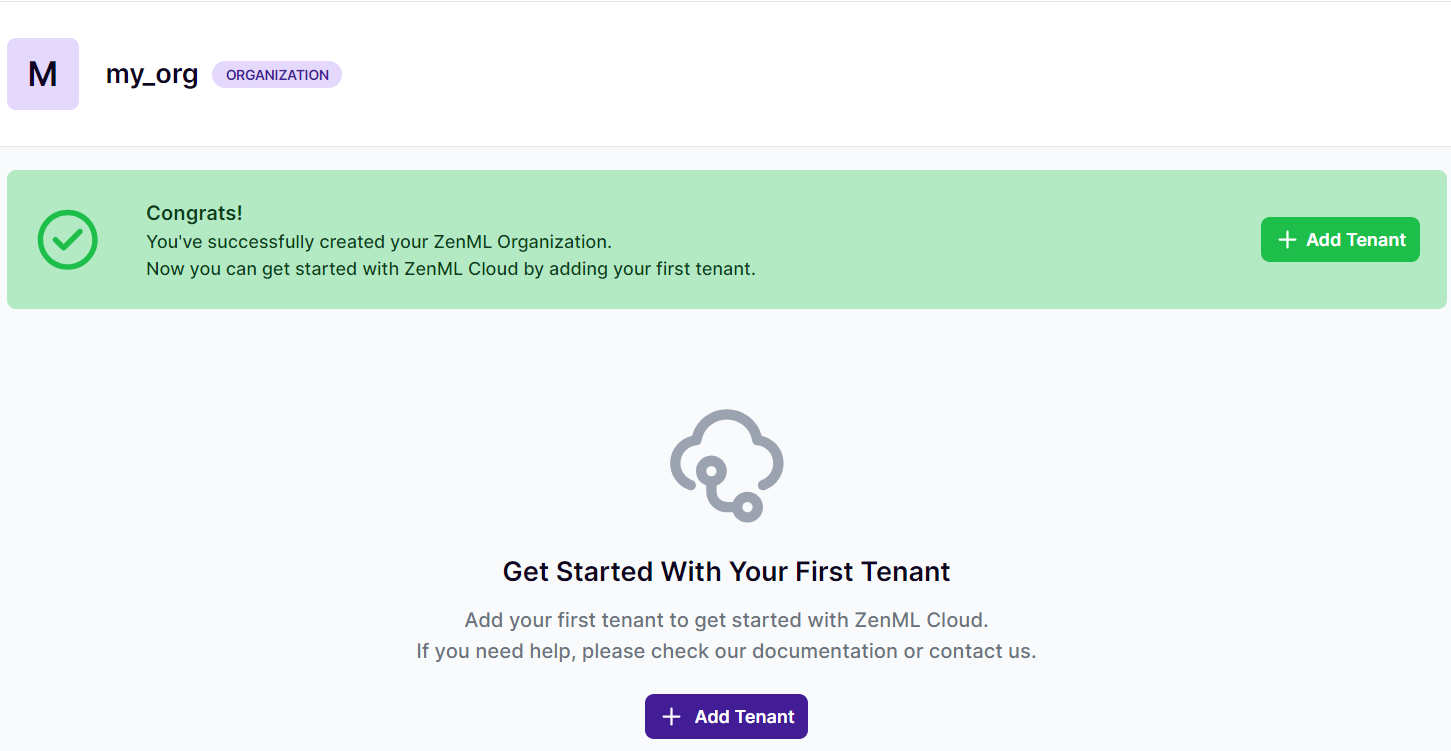
- After configuring your account, establish your organization and initiate a Tenant.
STEP 2:
Click **“Add Tenant”.**Enter the name of the Tenant and create the tenant.
- In ZenML Pro, a tenant is an isolated workspace on a server. It allows teams to manage their projects and resources separately.
STEP 3:
Login to your ZenML Pro tenant.
zenml connect --url #Access your URL through ZenML Pro- Do the required authorization.This example illustrates model training and pipeline creation using the breast cancer dataset, providing insights into practical model training. It is a simple example designed to run quickly for demonstration purposes. In a real-world scenario, you would likely work with a larger dataset and more complex code.
STEP 4:
Run the model training pipeline.
Execute the necessary pipelines via the command line:
- Run the model training pipeline
python run.py --training-pipeline- Run the inference pipeline
python run.py --inference-pipelineOnce it runs, your dashboard will show all the details of the associated run, models, artifacts, and visualization of model health.
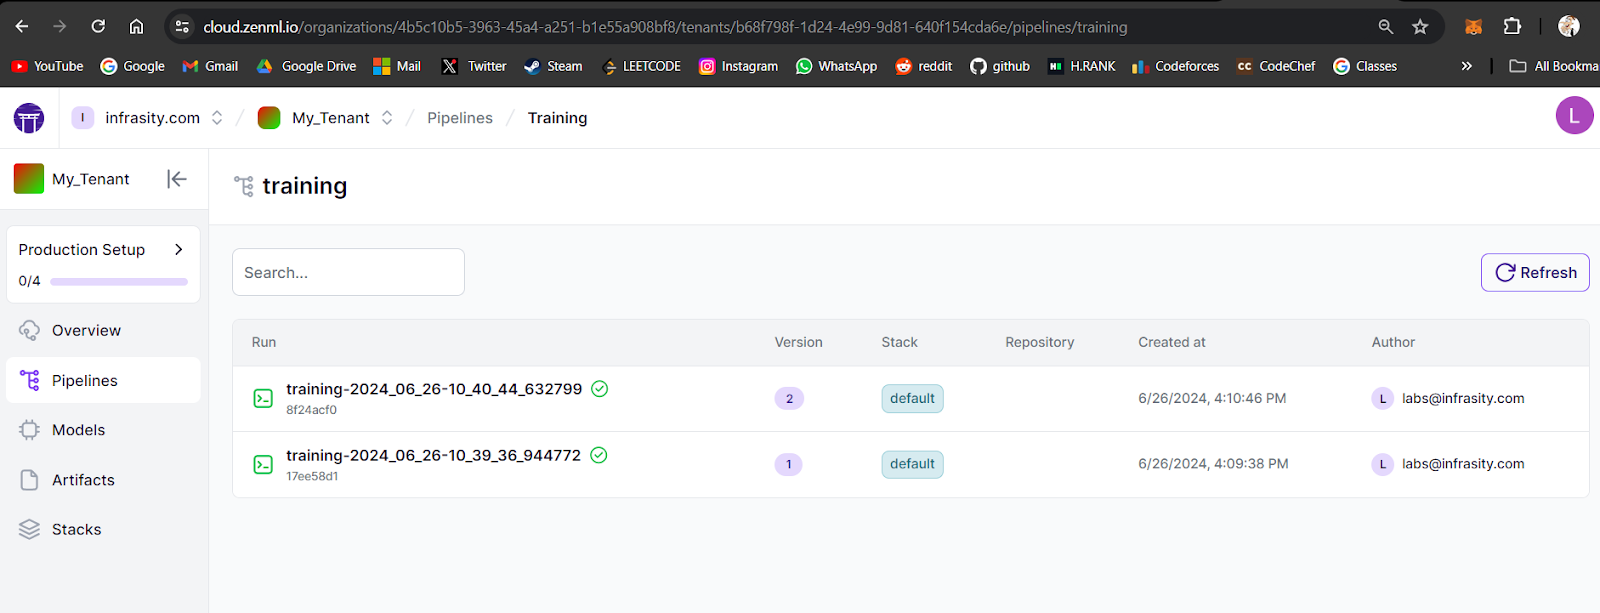
Go to your ZenML Pro account and view the pipeline status.
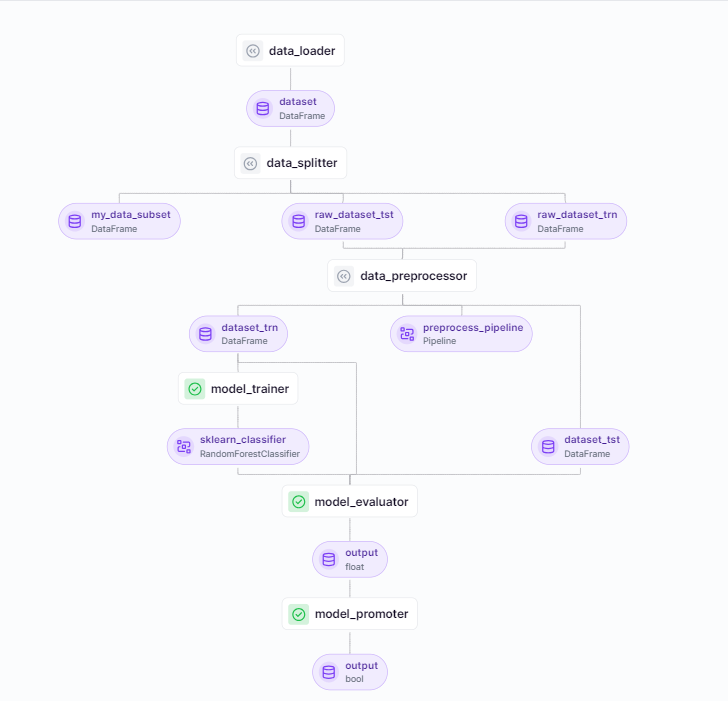
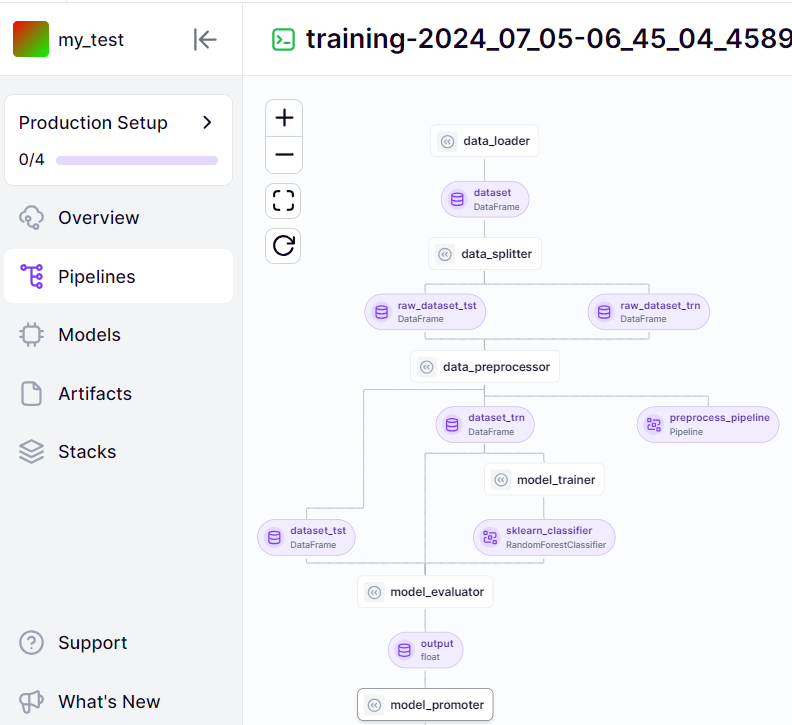
Detailed Breakdown of a Machine Learning Pipeline:
- data_loader: Loads the initial dataset (DataFrame). This step involves fetching the raw data that will be used for training and testing the model.
- data_splitter: Splits the dataset into training and test subsets (my_data_subset, raw_dataset_tst, raw_dataset_trn). This step ensures the data is divided appropriately to evaluate the model's performance accurately.
- data_preprocessor: Processes raw datasets into training and test sets (dataset_trn, dataset_tst) and defines the preprocessing pipeline. This step includes cleaning, transforming, and normalizing the data to make it suitable for model training.
- model_trainer: Trains a RandomForestClassifier model using the processed training dataset, focusing on model accuracy and model robustness. This step involves using the prepared data to train the machine learning model and optimizing it for the best performance.
- model_evaluator: Evaluates the trained model using the test dataset, providing an evaluation metric (float). This step assesses the model's performance on unseen data to ensure it generalizes well and performs accurately.
- model_promoter: Decides on model promotion based on the evaluation result (boolean).
This pipeline loads splits, preprocesses data, trains, evaluates, and potentially promotes a machine learning model. It focuses on efficient model training, ensures model robustness, and includes sentiment analysis to enhance the model’s performance and applicability.
Introduction to Kubeflow
Kubeflow is an open-source framework that orchestrates machine-learning processes on Kubernetes, providing seamless integrations and reducing infrastructure requirements. It offers an extensive toolbox for managing complex, scalable machine learning systems. Kubeflow is the ideal choice for enterprises looking to apply machine learning procedures on a big scale since its components address every stage of the ML lifecycle, from data intake to model deployment and servicing.
Why Use Kubeflow - Use Cases and Complexity:
Kubeflow is especially beneficial in high computing cases, complicated pipelines, and multi-tenant setups, enabling efficient collaboration
- Automating large-scale ML pipelines across various infrastructure environments.
- Experimentation and model tuning, where it is essential to manage several experiments simultaneously.
- Multi-user collaboration, providing isolated environments for different users or teams, ensuring effective teamwork, and building a solid community of users.
However, with such great powers comes a level of complication. Kubeflow requires a firm understanding of Kubernetes, which may mean a longer learning curve. Pipeline maintenance, scalability, and deployment management may be easier to achieve with Kubernetes expertise.
ZenML vs. Kubeflow - What Makes ZenML Unique
| Aspect | Kubeflow | Kubeflow with ZenML |
|---|---|---|
| Ease of Use | Requires a good understanding of Kubernetes. Kubeflow can be a barrier for ML-focused developers as you have to focus on k8s management, kubeflow, and instio. | ZenML abstracts Kubernetes complexity, focusing on ML and providing an intuitive interface, reducing the learning curve. |
| Integration Flexibility | Limited to Kubernetes-native tools and extensions. Restricts to compatible tools and methodologies. | ZenML integrates various MLOps tools with Kubeflow, adding different components based on needs and enhancing business outcomes through efficient management. |
| Workflow Customization | Powerful but complex Kubernetes-native orchestration. Customization requires deep Kubernetes knowledge. | ZenML provides a flexible and user-friendly layer on top of Kubeflow with easy pipeline customization. |
| Orchestration | Kubeflow provides strong capabilities, but they are Kubernetes-native and complex. | With ZenML, you can simplify workflow management, avoiding the need for direct manipulation of Kubernetes, which can be complex and time-consuming. |
Getting started with ZenML stacks and Kubernetes architecture
**Prerequisites:**Basic Kubernetes Knowledge:
- Kubernetes is an open-source platform for automating the deployment, scaling, and management of containerized applications.
Basic Knowledge of how pipelines work:
- The Exact Code:
- This includes all the steps of a pipeline, from data ingestion to deployment. Every step should be codified to ensure reproducibility and clarity.
- Parameter Values:
- The values of the parameters at each step must be clearly defined. These parameters can significantly influence the pipeline's outcome and performance, ensuring reproducible workflows.
- Infrastructure Configuration:
- The environment where the pipeline runs should be specified. This includes the hardware, software, and any dependencies required to run the pipeline.
Practical understanding of ZenML stacks concept
A** ZenML stack** configures various tools and infrastructure components on which your ML pipelines run. It lets you separate your code from the underlying infrastructure, making your workflows more modular and adaptable. When you run ZenML code without configuring a specific stack, it runs on the default stack.
Components of a Stack
A stack in ZenML consists of multiple components, each serving a specific role:
- Orchestrator: It is responsible for executing the pipeline code.
- Artifact Store: Persists the outputs of each step in the pipeline.
- Additional Components: Experiment trackers, model deployers, and container registries can also be part of a stack.
Default Stack
The default stack typically includes a local orchestrator and a local artifact store. When you followed the previous steps, you were already using the default stack, even though it wasn’t explicitly mentioned then. While running your ML pipelines locally, ZenML manages the orchestration and artifact storage seamlessly behind the scenes using the default stack, adhering to regulatory requirements.
- You can view details of your active stack using the following command:
zenml stack describeThe above command provides information about the components of the active stack, including the orchestrator and artifact store you have been using. This will help you understand the setup better as you work with Kubeflow, where you’ll see how ZenML’s abstraction simplifies the transition to more complex infrastructure, including automated testing.
Benefits of ZenML Stacks
- Modularity: ZenML allows you to create modular stacks, combining different orchestrators, artifact stores, and other components to fit your needs. This supports complex ML workflows and ensures model effectiveness.
- Reusability: Consistent stacks across projects. Define a stack once and reuse it across multiple projects, ensuring continuous training.
- Simplicity: ZenML abstracts the complexity of tool integration. It handles the integration of various tools, making it easier to manage your ML pipelines without delving into the intricate details.
- Flexibility: ZenML enables you to seamlessly switch between different stacks, such as from local to cloud-based setups, without modifying your pipeline code, ensuring consistent deployment environments.
- Code Consistency: ZenML’s abstraction layer ensures that your pipeline code remains the same, regardless of the underlying infrastructure stack.
What is an orchestrator?
- The orchestrator is an essential component in any MLOps stack, as it is responsible for running your machine learning pipelines. To do so, the orchestrator provides an environment set up to execute the steps of your pipeline, facilitating root cause analysis when issues arise. It also ensures that the steps of your pipeline only get executed once all their inputs (outputs of previous steps of your pipeline) are available.
When to use it
- The orchestrator is a mandatory component in the ZenML stack. It stores all artifacts produced by pipeline runs, ensuring reliable deployment and seamless integrations for machine learning engineers.
How to use it
- Data scientists don't need to interact directly with any ZenML orchestrator in your code. As long as the orchestrator that you want to use is part of your active ZenML stack, using the orchestrator is as simple as executing a Python file that runs a ZenML pipeline:
python file_that_runs_a_zenml_pipeline.py to streamline model training.
Orchestrators and ZenML Abstraction
Orchestrators are a crucial part of ZenML’s modular architecture. They define how and where your pipelines are executed. ZenML abstracts your existing infrastructure, enabling you to switch between different orchestrators with minimal changes to your pipeline code.
ZenML simplifies the orchestration process, allowing you to focus on building and optimizing your machine-learning models rather than managing the underlying infrastructure, ensuring alignment with key performance indicators. For instance, with the Kubeflow orchestrator, ZenML handles creating and managing multiple pods, services, and Kubernetes resources, which can be complex and time-consuming.
Kubernetes vs. Kubeflow: When to Use Each Orchestrator
Steps to Run Pipelines with Kubernetes Orchestrator
Running Pipelines with Kubernetes-Native Orchestration
- If you prefer not to use Kubeflow, ZenML allows you to run pipelines using the Kubernetes orchestrator, providing a reliable deployment environment and reducing additional infrastructure management complexity.
To use the Kubernetes orchestrator, we need:
**STEP 1: **Integration
zenml integration install kubernetes**STEP 2: **Prerequisites
- Docker installed and running
- kubectl installed.
- Kubernetes Cluster cluster is up and running.
**STEP 3: **Set Up Kubernetes Context
- Configure your Kubernetes context to point to the target cluster:
kubectl config get-contexts  # To see available contexts
kubectl config use-context <YOUR_CONTEXT>
**STEP 4: **Artifact Stores
- The Artifact Store is a central component in any MLOps stack. As the name suggests, it acts as a data persistence layer where artifacts (e.g., datasets, models) ingested or generated by the machine learning pipelines are stored.
- Register a new artifact store
zenml artifact-store register ARTIFACT_STORE_NAME --flavor=ARTIFACT_STORE_FLAVOR [--ARTIFACT_STORE_OPTIONS]
- If you would like to see the available flavors of Artifact Stores, you can use the command:
zenml artifact-store flavor list
**STEP 5: **Container Registries
- The container registry is an essential part of most remote MLOps stacks. It stores container images built to run machine-learning pipelines in remote environments. Containerizing the pipeline code creates a portable environment that allows code to run isolatedly.
- Register a new container registry.
zenml container-registry register CONTAINER_REGISTRY_NAME --flavor=CONTAINER_REGISTRY_FLAVOR [--CONTAINER_REGISTRY_OPTIONS]
- If you would like to see the available flavors of container registries, you can use the command:
zenml container-registry flavor list
**STEP 6: **Orchestrator
zenml orchestrator register ORCHESTRATOR_NAME --flavor=ORCHESTRATOR_FLAVOR [--ORCHESTRATOR_OPTIONS]- kubectl installed and the name of the Kubernetes configuration context that points to the target cluster (i.e., run kubectl config get-contexts to see a list of available contexts).
Note: It is recommended that you set up a Service Connector to connect ZenML Stack Components to the remote Kubernetes cluster, especially if you are using a Kubernetes cluster managed by a cloud provider like AWS, GCP, or Azure. This guarantees that your Stack is fully portable to other environments and that your pipelines are reproducible.
STEP 7: Stack
- A stack configures the tools and infrastructure on which your pipelines can run. The pipeline will run on the default stack when you run ZenML code without configuring a stack.
- To register a new stack, you must already have registered its components using the below commands.
zenml stack register a_new_local_stack -o default -a my_artifact_store -r my_cont_reg- Administering the stack
zenml stack set gcp_kubernetes_stack- ZenML will build a Docker image called
<CONTAINER_REGISTRY_URI>/zenml:<PIPELINE_NAME>, which includes your code, to run your pipeline steps in Kubernetes. Check out this page to learn more about how ZenML builds these images and how you can customize them.
You can now run any ZenML pipeline using the Kubernetes orchestrator:
python file_that_runs_a_zenml_pipeline.py- If all went well, you should now see the logs of all Kubernetes pods in your terminal. When running kubectl get pods -n zenml, you should also see a pod created in your cluster for each pipeline step.
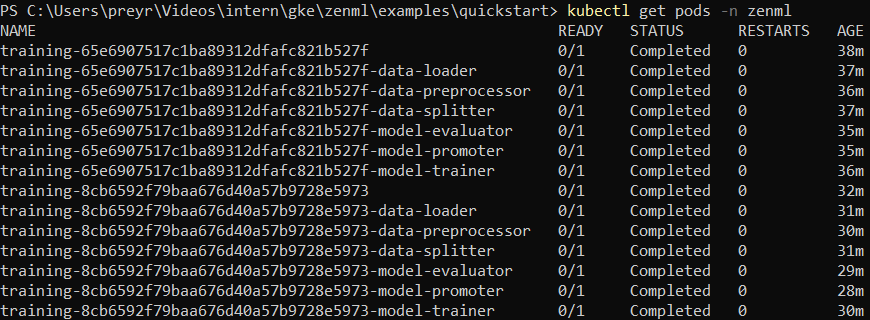
**Note: **Ensure that the Kubernetes namespace <zenml> does exist in your cluster. If not
- You can create the namespace using the
kubectlcommand-line tool:
kubectl create namespace zenml- Ensure the namespace has been created successfully:
kubectl get namespacesCleanup
- If you just want to delete the pods created by the example run, execute the following command:
kubectl delete pods -n zenml -l pipeline=kubernetes_example_pipelineTransitioning to the Kubeflow orchestrator
By transitioning your ZenML pipelines to use the Kubeflow orchestrator, you can significantly enhance your machine learning workflows by leveraging Kubeflow’s powerful orchestration capabilities. The setup process is straightforward and builds upon your existing Kubernetes infrastructure. The setup is quite similar if you prefer to run ZenML on Kubeflow instead of directly on Kubernetes. Below are the detailed steps to get you started.
Run Pipeline using the Kubeflow orchestrator.
To use the Kubeflow orchestrator, we need:
Kubeflow Deployment: Kubeflow needs to be deployed on your Kubernetes cluster. This involves installing Kubeflow components and ensuring your cluster is configured to support Kubeflow.
**STEP 1: **Integration
zenml integration install kubeflow**STEP 2: **Prerequisites
- Kubernetes Cluster: Ensure you have a running Kubernetes cluster (e.g., GKE, EKS, AKS).
- Running
kubectl config get-contextsto see a list of available contexts will reveal the name of your Kubernetes configuration context, which points to your remote cluster.
- Running
- NOTE: This is no longer required if you use a Service Connector to connect your Kubeflow Orchestrator Stack Component to the remote Kubernetes cluster.
STEP 3: Artifact store
- A remote artifact store as part of your stack
- Register a new artifact store
zenml artifact-store register ARTIFACT_STORE_NAME --flavor=ARTIFACT_STORE_FLAVOR [--ARTIFACT_STORE_OPTIONS]- List of all the
artifact-store
zenml artifact-store list
**STEP 4: **Remote container registry
- A remote container registry as part of your stack.
- Register a new container registry.
zenml container-registry register CONTAINER_REGISTRY_NAME --flavor=CONTAINER_REGISTRY_FLAVOR [--CONTAINER_REGISTRY_OPTIONS]- List of all the container registry
zenml container-registry list
**STEP 5: **Kubeflow Orchestrator
zenml orchestrator register <ORCHESTRATOR_NAME> --flavor kubeflow- List of all the orchestrators
zenml orchestrator list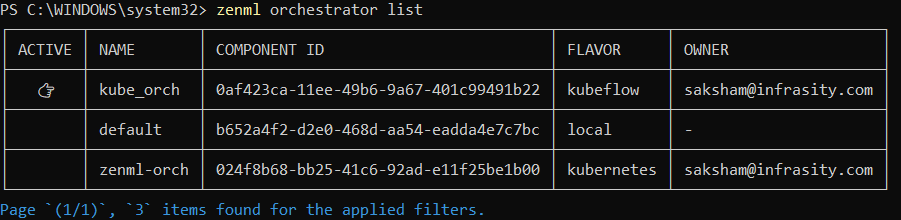
STEP 6(Optional): Remote Image Builders
- The image builder is an essential part of most remote MLOps stacks. It builds container images so that your machine-learning pipelines and steps can be executed in remote environments.
- A remote Image builder as part of your stack.
zenml image-builder register <NAME> --flavor=<provider>- List of all image builders
zenml image-builder list
STEP 7: Stack
zenml stack register a_new_local_stack -o default -a my_artifact_store -r my_cont_reg -i img- Administering the stack
zenml stack set <stack_name>- List of all the stacks
zenml stack list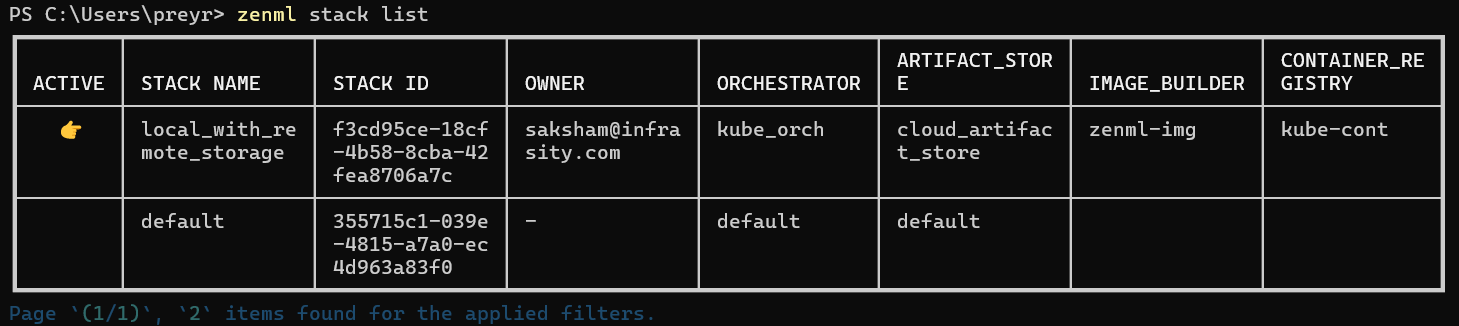
You can now run any ZenML pipeline using the Kubeflow orchestrator:
python file_that_runs_a_zenml_pipeline.py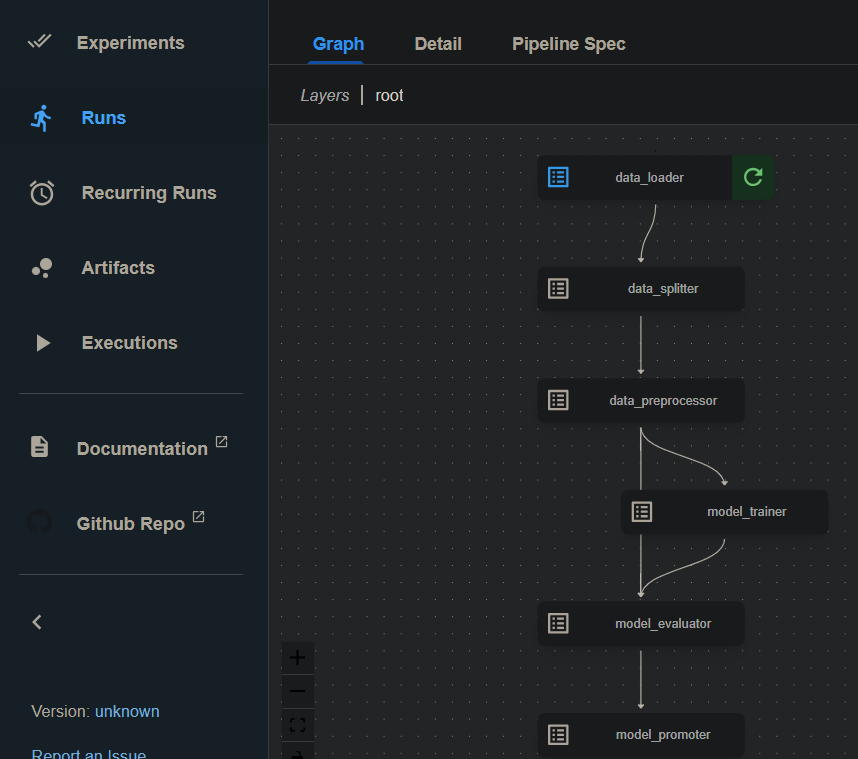
- Access Kubeflow UI
- You can access the Kubeflow UI to monitor your pipeline runs. Retrieve the URL in Python if needed:
Python Code:
from zenml.client import Client
pipeline_run = Client().get_pipeline_run("<PIPELINE_RUN_NAME>")
orchestrator_url = pipeline_run.run_metadata["orchestrator_url"].value
print(f"Kubeflow UI URL: {orchestrator_url}")
How Monitoring Pipelines in ZenML Pro is Better Than Kubeflow
ZenML Pro offers a streamlined, user-friendly experience for managing and monitoring ML pipelines, with advanced metrics tracking, visualization, and alert features. It simplifies the process of orchestrating ML workflows on Kubernetes and provides a powerful alternative to Kubeflow, particularly for teams looking for ease of use and integrated monitoring capabilities.
Kubeflow, on the other hand, is a robust and mature solution for complex, large-scale ML workflows, but it comes with added complexity and setup overhead. Depending on your specific needs and expertise, either ZenML Pro or Kubeflow can be the right choice for orchestrating your ML pipelines.
Conclusion
In this tutorial, we explored setting up ZenML with Kubernetes and Kubeflow to streamline machine learning operations. ZenML, an open-source MLOps framework, simplifies the complexities of MLOps by providing robust, production-ready pipelines with extensive integration options.
We discussed its critical features, such as pipeline versioning, integration flexibility, and scalability, catering to various roles within a machine learning team. We provided steps to run pipelines locally and in the cloud with ZenML Pro, highlighting the advantages of modularity, reusability, and flexibility. These enable us to run arbitrary ML pipelines in a scalable cloud environment without changing a single line of our ML code.
Additionally, we covered the integration with Kubeflow, demonstrating how ZenML abstracts Kubernetes complexities, making it accessible and efficient for rapid ML model deployment and enhanced business outcomes.
If you want to know more about ZenML or see more examples, check out our docs and examples or join our Slack.
❓FAQ
- Find answers to the most frequently asked questions about ZenML.
Is ZenML Free?
Yes, ZenML is free! The open-source version is available under the Apache License 2.0 and includes all core functionalities for building and managing ML pipelines. ZenML Pro is a paid option with advanced features like a managed control plane, role-based access control, and enhanced observability.
How to Use ZenML?
Register your staging and production environments as ZenML stacks to seamlessly manage and run ML workflows. This also provides a user interface to browse, explore, and manage your ML pipelines efficiently.
How Does Kubeflow Work with Kubernetes?
Kubeflow acts as an orchestrator that ZenML can seamlessly integrate. ZenML abstracts the complexities of Kubernetes and Kubeflow, allowing you to focus on building and optimizing ML pipelines. This integration leverages Kubeflow’s capabilities while simplifying orchestration and management for scalable and efficient ML workflows.
What is Kubernetes Infrastructure?
Kubernetes infrastructure manages containerized applications at scale. ZenML enables the orchestration and scaling of ML pipelines on Kubernetes clusters, providing a reliable and scalable environment for deploying and managing ML models.