On this page
Most of the newer AI models like OpenAI’s o1, Claude’s Sonnet 3.5, and the newly released open-source Janus Pro from Deepseek are multimodal. They can take diverse data types from text to images. These models allow users to provide more information from different sources and derive insights from it. Businesses are embracing the multimodality breakthrough. Imagine the enhanced customer service experience when a user uploads an image of a damaged product and inquires about how to operate it, receiving a rapid response.
Multimodal AI models are powerful but come with challenges. They need to handle large and diverse datasets and complex integrations. Recent advancements have made building and deploying these models easier, but having a clear process is still important. In this article, we will use ZenML to fine-tune a vision model with Supervised Fine Tuning (SFT) and deploy it on Hugging Face inference endpoints.
Challenges & Solution
There are three main challenges in working with LLMs:
- Model Deployment: Scaling and integrating LLMs into production environments while ensuring performance and reliability can be complex.
- Continuous Improvement: Iteratively fine-tuning LLMs to stay relevant and aligned with user needs is resource-intensive and requires robust feedback loops.
- Monitoring and Observability: Tracking model behavior, detecting issues like bias or hallucinations, and ensuring quality control in real-time is a critical but challenging task.
A new type of operation, LLMOps (Large Language Model Operations), mitigates these problems. It is a set of tools, processes, and practices for managing large language models’ deployment, maintenance, and optimization. It parallels DevOps and MLOps.
LLMOps covers everything from collecting and preparing data to training models using techniques like unsupervised and supervised learning. Once built, the model is deployed with the right infrastructure and configurations. Ongoing management ensures performance, security, and updates as needed. ZenML provides a comprehensive framework for implementing LLMOps, so let’s look into its details further.
Concepts of ZenML
ZenML is an open-source MLOps framework designed to make machine learning workflows portable, production-ready, and collaborative. Multimodal LLMs handle different types of data, such as text, images, and audio. However, coordinating everything like preprocessing, training, evaluation, and deployment, can be complex without a clear framework. ZenML’s modular architecture provides this structure, allowing developers to define, execute, and manage workflows. Let’s discuss the key concepts behind ZenML:
Steps
Steps are the building blocks of a pipeline. Each step represents a specific task, such as cleaning data, extracting features, or training a model. Steps are annotated with the @step decorator and can accept inputs and produce outputs, which are automatically tracked as artifacts. For example:
@step
def preprocess_text() -> str:
   return "Processed text data"

@step
def train_model(text_data: str) -> str:
   return f"Model trained on {text_data}"
Steps promote modularity and reusability, making it easy to experiment with different approaches.
Pipelines
A pipeline in ZenML represents the backbone of an ML workflow. It organizes tasks such as data ingestion, preprocessing, model training, and evaluation into a coherent flow. Pipelines are defined in code using Python decorators like @pipeline, ensuring the workflow logic is clear and maintainable. For instance:
@pipeline
def multimodal_pipeline():
   text_data = preprocess_text()
   image_data = preprocess_image()
   model = train_multimodal_model(text_data, image_data)
   evaluate_model(model)
Here, tasks such as preprocess_text and preprocess_image handle different data modalities, and their outputs feed into the train_multimodal_model step. ZenML simplifies handling complex dependencies between tasks by structuring workflows this way.
Artifacts
Artifacts in ZenML are the data outputs generated by steps. They are automatically versioned and stored in the artifact store, allowing seamless reproducibility of experiments. For instance, the processed text data from preprocess_text becomes an artifact passed to the train_model step.
Stacks
A stack in ZenML defines the infrastructure and tools required to execute a pipeline. It consists of multiple components, such as orchestrators, artifact stores, and model deployment platforms. For example, a local stack might use a local orchestrator and file-based artifact store for experimentation. In contrast, a production stack could integrate with a cloud-based orchestrator and storage service.
Stack Components
Each stack comprises multiple components that handle specific functions within the workflow. Key components include:
- Orchestrator: Manages the execution of pipeline steps. For example, a Kubernetes-based orchestrator can scale workflows to handle large datasets and complex models.
- Artifact Store: Stores artifacts generated by pipeline steps. Options range from local storage to cloud services like AWS S3.
- Experiment Tracker: Tracks metrics, parameters, and results, facilitating comparison and optimization of experiments.
- Model Deployer: Connects to different model deployment services like hugging face inference endpoints.
ZenML provides built-in flavors for these components while allowing customization to suit specific requirements.
ZenML Server
A ZenML Server becomes essential when moving to production. The server is a centralized endpoint for managing pipelines, models, metadata, and secrets. Key features include:
- Metadata Tracking: Logs pipeline runs, parameters, and results for transparency and troubleshooting.
- Secrets Management: Stores sensitive information like API keys and credentials securely.
- Collaboration: Allows multiple users to access and contribute to shared projects.
Deploying a ZenML Server can be done through the ZenML Pro SaaS offering or in a self-hosted environment, ensuring flexibility for organizations with diverse infrastructure needs. Let’s use these concepts to fine-tune a multimodal model. For this guide, we will be using ZenML Pro for LLMOps.
Implementation
The goal is to enable multimodal models to accurately understand and execute spatial instructions. Tasks such as identifying objects based on relative positioning (e.g., “What’s left of the red box?”) or determining proper object placement (e.g., “How should I position the object to stack it correctly?”) require advanced reasoning capabilities. This is particularly useful in applications like robotics, where systems process multiple data formats to make informed decisions. Multimodal models can serve as the “brain” of a robot, allowing it to interpret and execute spatial instructions with precision.
Solution
We will implement a pipeline for training a multimodal model, focusing on spatial reasoning tasks. This includes:
- Setting up the development environment.
- Using 3DSRBench as the dataset.
- Preprocessing data effectively.
- Fine-tuning Qwen-VL-2b-instruct, a vision-language model.
- Performing inference to evaluate results.
- Writing a Pipeline that deploys the model.
Here are the following pipelines involved in our solution:
- Fine-Tuning Pipeline: This pipeline ensures that the model is fine-tuned on the train and evaluation set.
- Dataset visualization Pipeline: This pipeline loads the data, preprocesses it and visualizes it.
- Evaluate Pipeline: This pipeline evaluates the fine tuned model on the sample test image.
Let’s break down the steps for implementation into the following sections:
Setup and Imports
Before starting, we used the Colab notebook to fine-tune the vision language model, which requires substantial computational power. When run in Google Colab, it will use an A100 GPU.
To get started, ensure the required libraries and tools are installed. Here’s the setup process:
!pip install zenml
!pip install torch torchvision
!pip install transformers
!pip install pillow
!pip install datasets
!pip install accelerate
!pip install trl
!pip install qwen_vl_utils
!pip install "zenml[server]"
Here are the imports required:
import os
import torch
import pandas as pd
import numpy as np
from PIL import Image
import random
from typing import List, Dict, Any, Tuple, Annotated
from zenml.steps import step
from zenml.pipelines import pipeline
from zenml.client import Client
from datasets import load_dataset
from trl import SFTTrainer, SFTConfig
from qwen_vl_utils import process_vision_info
import torch
After installing these dependencies, ensure you have ZenML to manage your pipelines and deployments efficiently. To begin, log in to ZenML. If you do not already have an account, sign up for one on the ZenML Pro.
These steps may not be necessary for local users, as ZenML allows for local experimentation without additional configurations. However, since we are using Google Colab for this setup, we need to connect to the ZenML Cloud.
To do this, retrieve the Server URL by navigating to the ZenML Cloud dashboard

!zenml init
!zenml login
At this point, your environment is ready to proceed with data preparation and model fine-tuning. The last step is to log in to Hugging Face to ensure the model is pushed to the repository for deployment on inference endpoints. To proceed, you must create a Hugging Face token by logging into your account. For this go HuggingFace token creation page and create a token. Ensure the token has the necessary permissions, such as read and write access to a repository and inference endpoints.
from huggingface_hub import notebook_login
notebook_login()
Enter the token when prompted to log in to the Hugging Face Hub.
Dataset
We use the 3DSRBench dataset for spatial reasoning tasks. This dataset is specifically designed to enhance the reasoning capabilities of multimodal language models. It includes images, questions, and answers related to spatial relationships and positioning tasks.
To load the dataset:
from datasets import load_dataset
@step
def load_data():
    return load_dataset("ccvl/3DSRBench")["test"] # The dataset has only test set.
Here’s what the data looks like:
{'index': 'VIN6MS3J',
 'question': 'Consider the real-world 3D locations of the objects. Which object has a higher location?',
 'A': 'baseball glove',
 'B': 'red hat of the person in red in the back',
 'C': None,
 'D': None,
 'answer': 'B',
 'category': 'height_higher',
 'image_source': 'MS-COCO',
 'image_url': 'http://images.cocodataset.org/train2017/000000557944.jpg'}
In real-world scenarios, multiple-choice options (e.g., A, B, C, D) are not typically available. Therefore, during the data preprocessing step, we will remove these options from the dataset and directly request the answer.We can visualize some sample images from the dataset using ZenML’s capabilities:
def fetch_image(image_url):
    """Fetch image from URL and return it as a PIL image object."""
    try:
        response = requests.get(image_url, stream=True, timeout=5)
        response.raise_for_status()
        return response.content
    except requests.exceptions.RequestException:
        return None

@step
def create_dataset_visualization(sample_data: list[Dict], sample_size = 10) -> HTMLString:
    """Creates a visualization of dataset samples and returns embedded HTML."""
    html_content = """
    <div style="text-align: center; font-family: Arial, sans-serif;">
    <h2>Dataset Visualization</h2>
    """
    for entry in sample_data[1:sample_size:2]:
        image_data = fetch_image(entry['image_url'])
        image_base64 = base64.b64encode(image_data).decode('utf-8') if image_data else None
        image_tag = f'<img src="data:image/png;base64,{image_base64}" style="max-width: 300px; height: auto;">' if image_base64 else '<p>[Image not available]</p>'

        html_content += f"""
        <div style="border: 1px solid #ddd; padding: 10px; margin: 10px; display: inline-block; text-align: left;">
            {image_tag}
            <p><strong>Question:</strong> {entry['question']}</p>
            <p><strong>Answer:</strong> {entry['answer']}</p>

        """

    html_content += "</div>"
    return HTMLString(html_content)

@pipeline
def dataset_visualization_pipeline():
    dataset = load_data()
    preprocessed_data = preprocess_data_step(dataset) # Function we will see later
    create_dataset_visualization(preprocessed_data)
This script fetches images from given URLs and embeds them into an HTML visualization alongside their corresponding questions and answers. It utilizes ZenML’s pipeline and step functionalities to automate the visualization process. If an image is unavailable, the script ensures graceful handling by displaying a placeholder message instead.
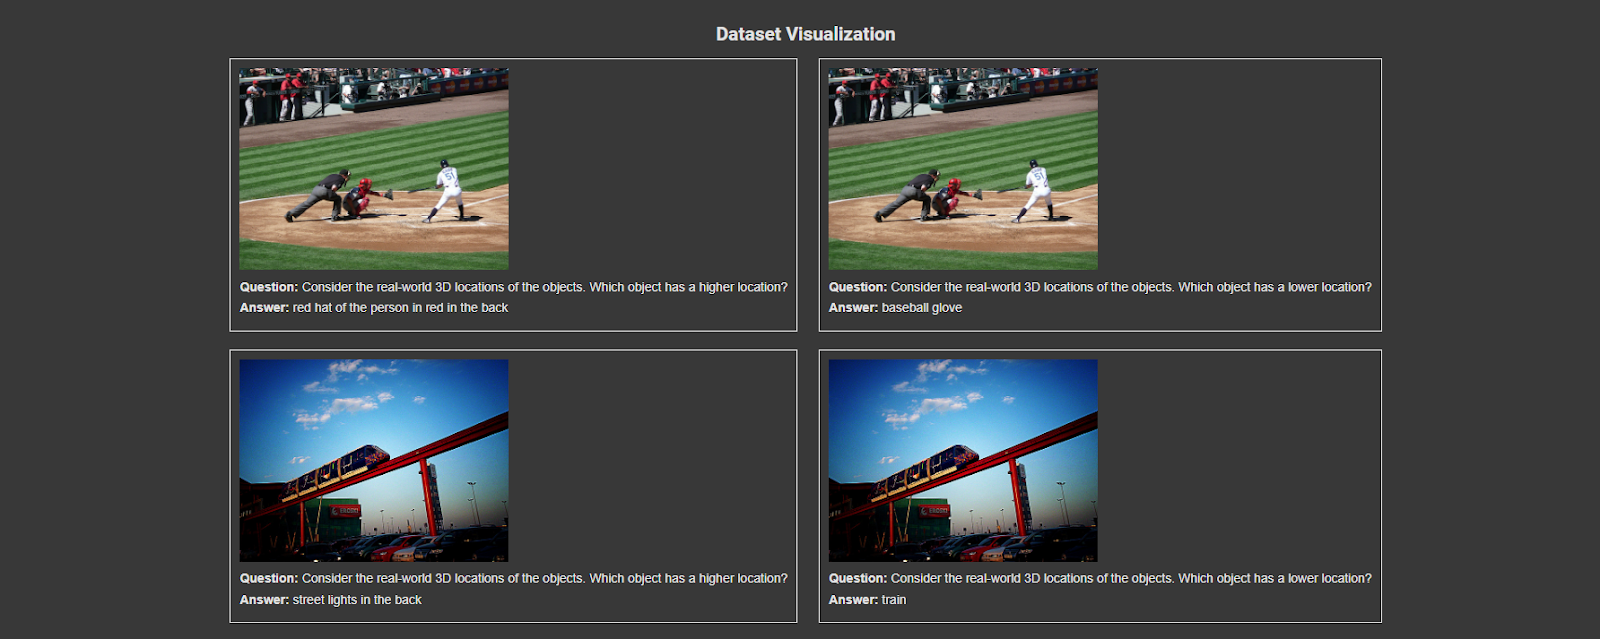
Note: The above visualization is done through Notebook, if you want it to be displayed on the ZenML dashboard, you are required to connect to the remote artifact store. Currently, we visualized it by using:
from zenml.client import Client
artifact = Client().get_artifact_version("<artifact-version>")
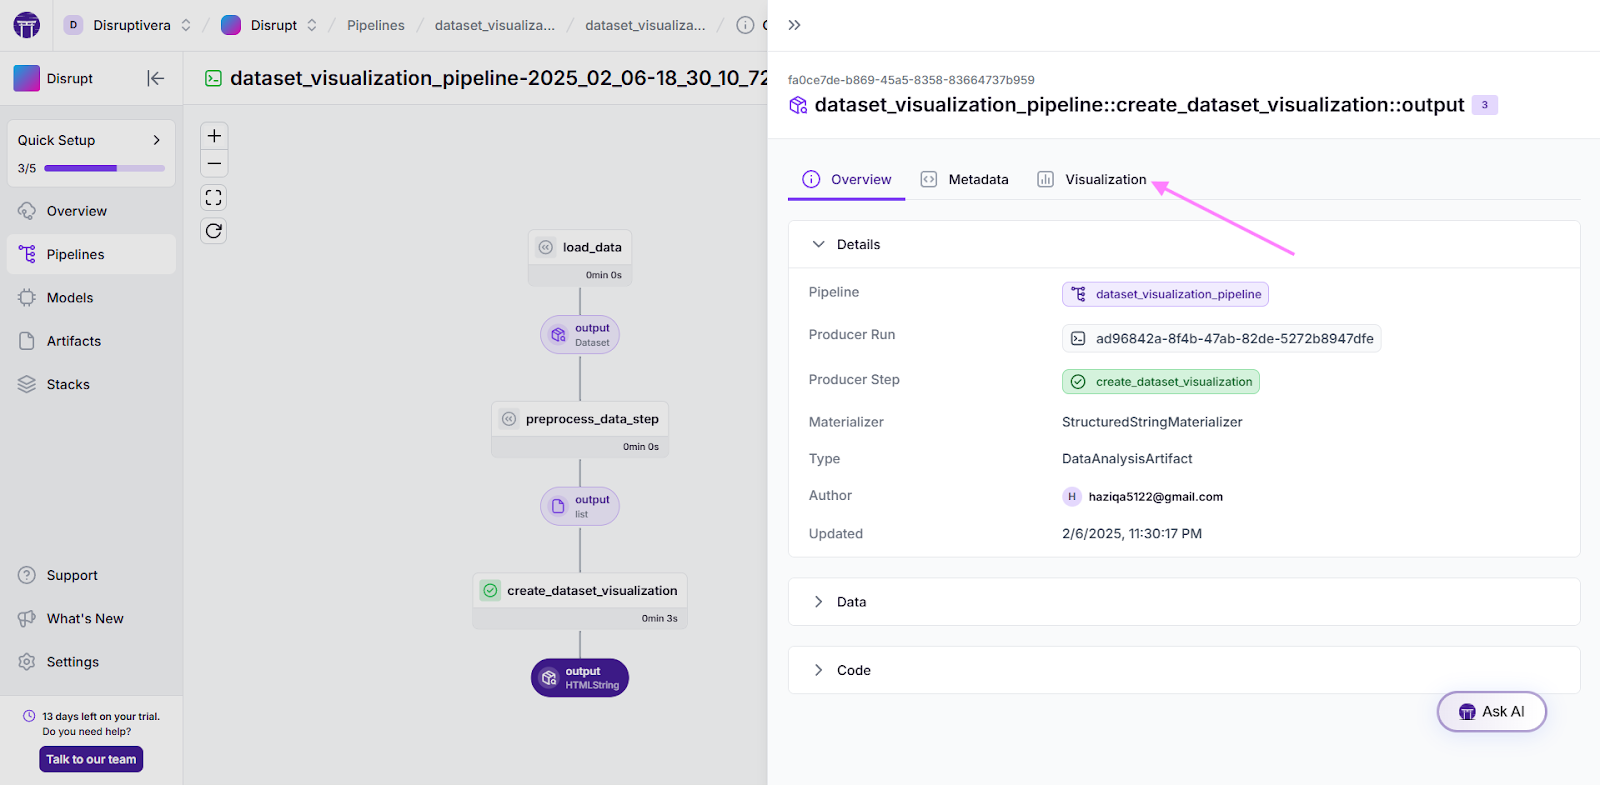
artifact.visualize()You can locate the artifact version by selecting the output node and navigating to the visualization tab.
Preprocessing
Preprocessing ensures the data is clean, formatted, and tokenized appropriately for model input. First, we aim to create a system message that describes the role of the Vision-Language Model (VLM) as an expert in analyzing spatial instructions, identifying objects, and responding to questions regarding spatial relationships. Here’s the rephrased system message tailored for this problem:
system_message = """
You are a Vision Language Model specialized in spatial reasoning.
Your task is to analyze the provided image and respond to queries about spatial relationships and positioning.
Focus on delivering accurate, concise answers based on the visual and textual information. Avoid additional explanation unless necessary.
"""
As Qwen models are chat models, they require a specific format. We’ll structure the dataset for chatbot interaction by formatting each exchange to include a system message and the image. The user’s query will follow, and the response will conclude the interaction.
from zenml import log_metadata

def format_data(sample):
    log_metadata(metadata={"system_message": system_message})
    return [
        {
            "role": "system",
            "content": [{"type": "text", "text": system_message}],
        },
        {
            "role": "user",
            "content": [
                {
                    "type": "image",
                    "image": sample["image_url"],
                },
                {
                    "type": "text",
                    "text": sample["question"],
                },
            ],
        },
        {
            "role": "assistant",
            "content": [{"type": "text", "text": sample["answer"]}],
        },
    ]
We will write the following functions to preprocess the dataset. All of these functions are decorated with @step.
- First, we will extract only the relevant fields, such as image_url, question,and answer.
@step
def preprocess_data_step(raw_data):
    # Simplified preprocessing function
    return [
        {
            'image_url': entry['image_url'],
            'question': entry['question'],
            'answer': entry[entry['answer']]
        }
        for entry in raw_data
    ]
2. Next, we will format the dataset using the function above.
@step
def format_data_step(raw_data):
    log_metadata(metadata={"system_message": system_message})
    return [format_data(sample) for sample in raw_data]
3. Later, the dataset will be divided into train, eval, and test subsets. The training and evaluation sets will be used in the fine-tuning pipeline, while the testing set will be reserved for performance testing.
@step
def split_data_step(formatted_data, train_ratio=0.70, eval_ratio=0.20, seed = 42) -> Tuple[
    Annotated[List, "train_set"],
    Annotated[List, "eval_set"],
    Annotated[List, "test_set"],
]:
    random.seed(seed)
    random.shuffle(formatted_data)  # Shuffle the dataset
    train_size = int(len(formatted_data) * train_ratio)
    eval_size = int(len(formatted_data) * eval_ratio)
    train_set = formatted_data[:train_size]
    eval_set = formatted_data[train_size:train_size + eval_size]
    test_set = formatted_data[train_size + eval_size:]
    return train_set, eval_set, test_set
Structuring preprocessing helps ensure the data is optimized for training and evaluation.
Fine-Tuning Model
In this step, we fine-tune the Qwen-VL-2b-instruct model for spatial reasoning tasks.
@step
def fine_tune_qwen2vl(
    model_id: str,
    train_set: Any,
    eval_set: Any,
    output_dir: str = "qwen2vl-model-2b-instruct-spatial-information",
    num_train_epochs: int = 3,
    per_device_train_batch_size: int = 4,
    gradient_accumulation_steps: int = 8,
    learning_rate: float = 2e-4,
    logging_steps: int = 5,
):

    log_metadata(
    metadata={
        "num_train_epochs": num_train_epochs,
        "per_device_train_batch_size": per_device_train_batch_size,
        "gradient_accumulation_steps": gradient_accumulation_steps,
        "learning_rate": learning_rate,
        "logging_steps": logging_steps,
    }
)

    model = Qwen2VLForConditionalGeneration.from_pretrained(
        model_id, device_map="auto", torch_dtype=torch.bfloat16
    )
    processor = Qwen2VLProcessor.from_pretrained(model_id)

    training_args = SFTConfig(
        output_dir=output_dir,
        num_train_epochs=num_train_epochs,
        per_device_train_batch_size=per_device_train_batch_size,
        per_device_eval_batch_size=per_device_train_batch_size,
        gradient_accumulation_steps=gradient_accumulation_steps,
        gradient_checkpointing=True,
        optim="adamw_torch_fused",
        learning_rate=learning_rate,
        lr_scheduler_type="constant",
        logging_steps=logging_steps,
        metric_for_best_model="eval_loss",
        greater_is_better=False,
        bf16=True,
        max_grad_norm=0.3,
        warmup_ratio=0.03,
        gradient_checkpointing_kwargs={"use_reentrant": False},
        dataset_kwargs={"skip_prepare_dataset": True},
        report_to=["none"],
    )
    training_args.remove_unused_columns = False

    def collate_fn(examples):
        texts = [
            processor.apply_chat_template(example, tokenize=False) for example in examples
        ]
        image_inputs = [process_vision_info(example)[0] for example in examples]

        batch = processor(
            text=texts, images=image_inputs, return_tensors="pt", padding=True
        )
        labels = batch["input_ids"].clone()
        labels[labels == processor.tokenizer.pad_token_id] = -100

        image_tokens = [151652, 151653, 151655]
        for image_token_id in image_tokens:
            labels[labels == image_token_id] = -100

        batch["labels"] = labels
        return batch

    trainer = SFTTrainer(
        model=model,
        args=training_args,
        train_dataset=train_set,
        eval_dataset=eval_set,
        data_collator=collate_fn,
        tokenizer=processor.tokenizer,
    )
    trainer.train()

    return model, processor
Here are the two important functions:
- The SFTTrainer provides multiple training arguments to control fine-tuning. Gradient checkpointing helps save memory by recomputing intermediate activations, while the learning rate controls the model's adaptation speed.
Effective batch size is managed by combining per_device_train_batch_size and gradient_accumulation_steps. Setting remove_unused_columns ensures that only relevant data columns are passed during training.
- The collate_fn combines multiple samples into batches, aligning text and image inputs. It also ensures padding tokens and irrelevant image tokens are ignored during loss computation.
After the model and the processor are returned, we will push it to the HuggingFace repository. Let’s create a function for that:
@step
def push_to_hub(model, processor, output_dir: str = "qwen2vl-model-2b-instruct-spatial-information"):
  model.push_to_hub(output_dir)
  processor.push_to_hub(output_dir)
Now, let’s create a pipeline for fine-tuning by calling the functions created:
@pipeline()
def finetuning_pipeline():
model_id = "Qwen/Qwen2-VL-2B-Instruct"
raw_data = load_data()
preprocessed_data = preprocess_data_step(raw_data)
formatted_data = format_data_step(preprocessed_data)
train_set, eval_set, test_set = split_data_step(formatted_data)
model, processor = fine_tune_qwen2vl(model_id, train_set, eval_set)
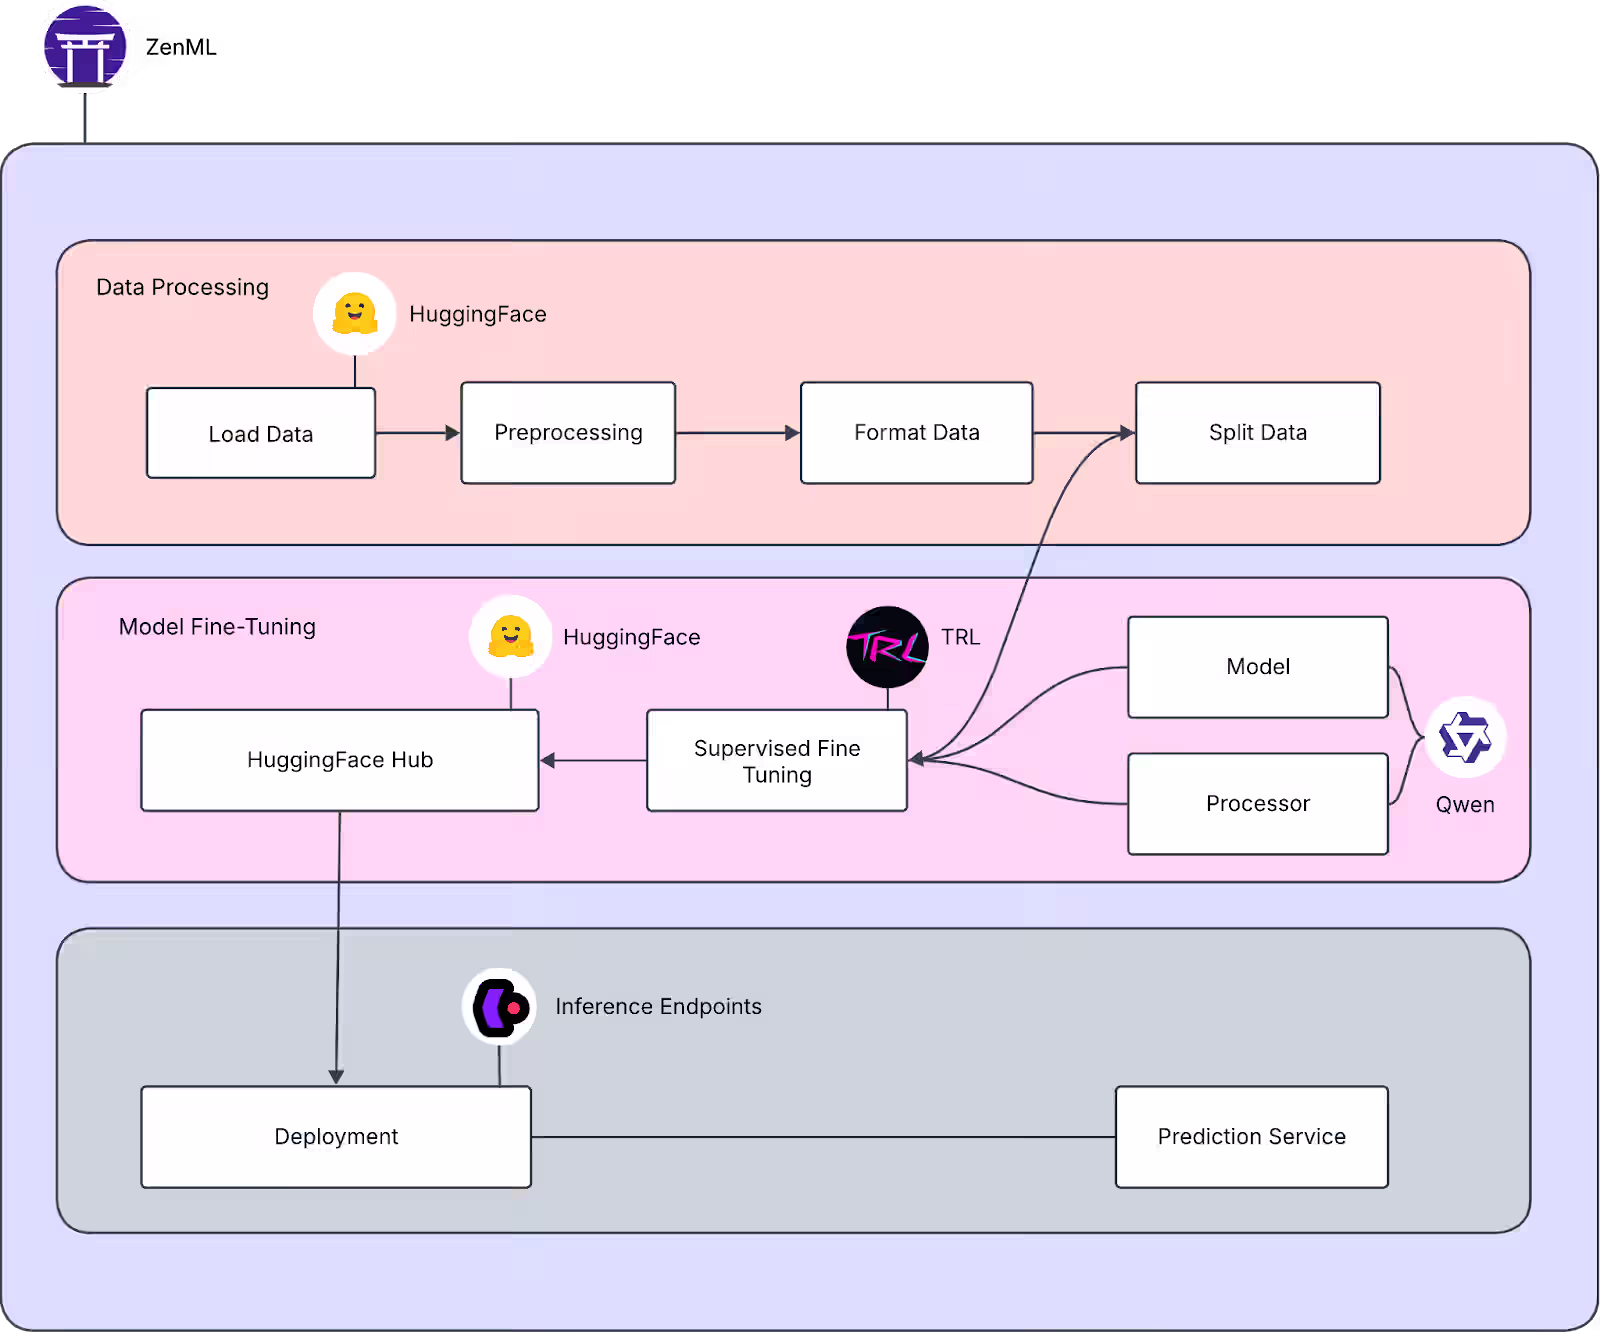
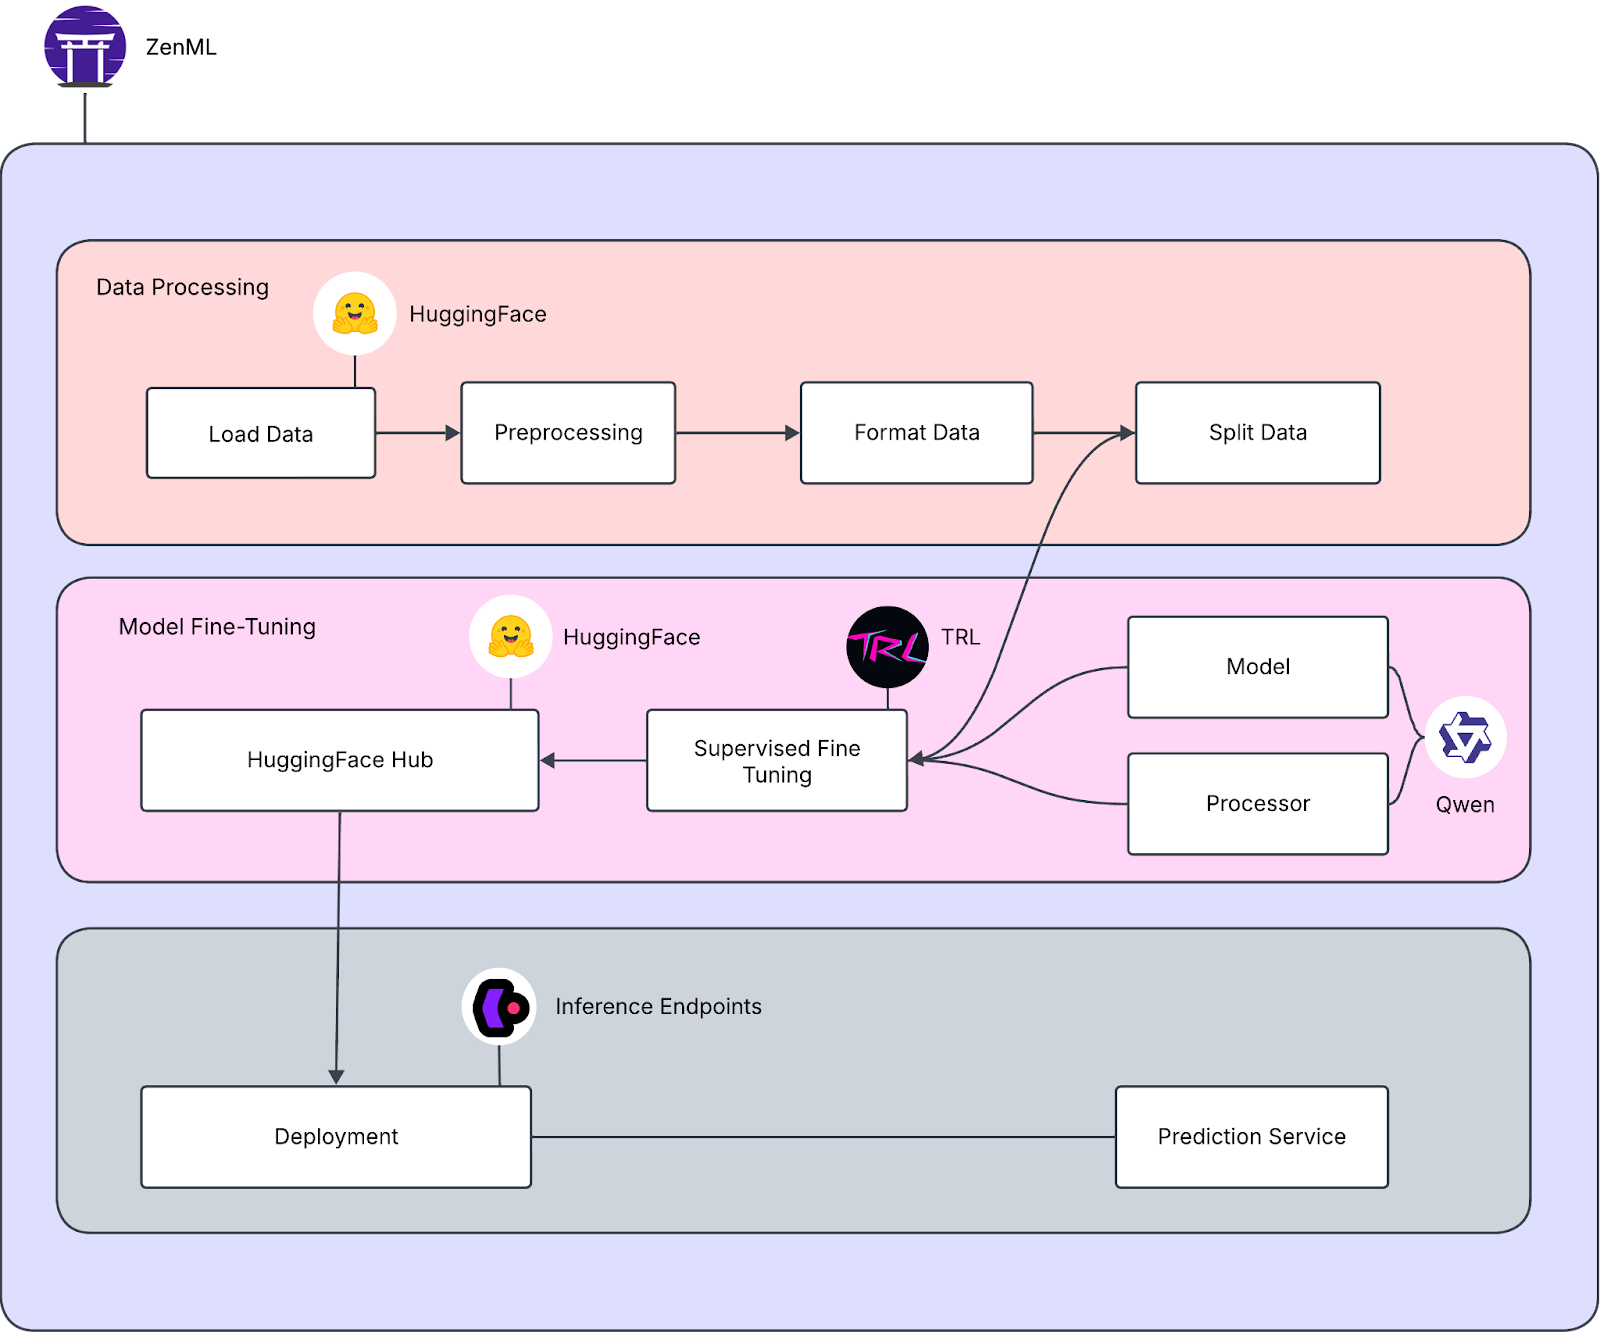
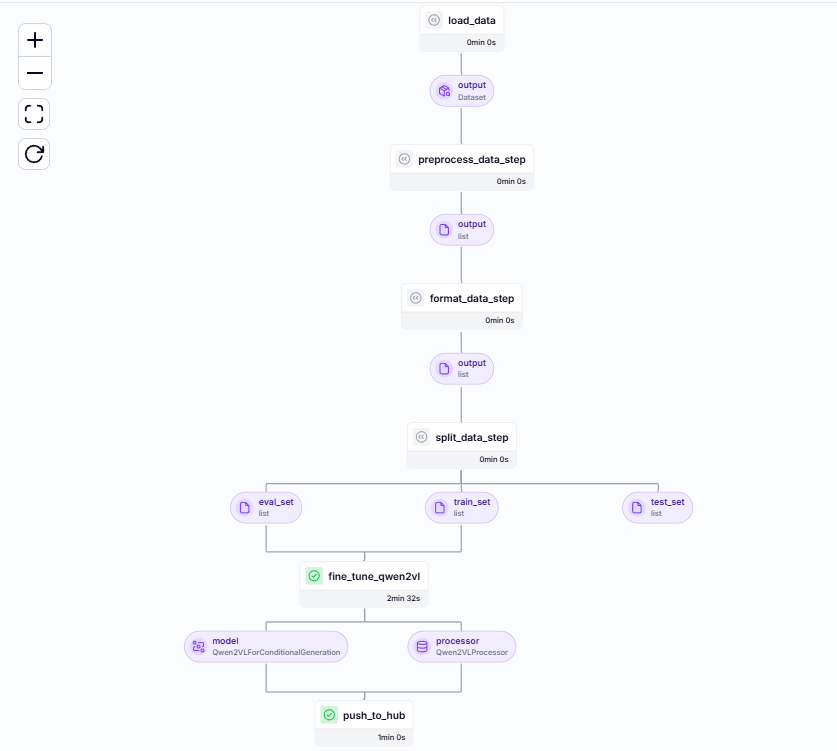
push_to_hub(model, processor)We can trigger the pipeline, and upon successful fine-tuning, it will be reflected on the ZenML dashboard. Below is a Direct Acyclic Graph (DAG) representation of the process:
We can see their outputs in the artifact store by clicking on the intermediate outputs like test_set. We will get the artifact ID and can see the results as follows:
from zenml.client import Client
artifact = Client().get_artifact_version("artifact_id")
artifact_data = artifact.load()
Before putting the model to work, check how well it performs by running some inferences.
Evaluate
Once the model is fine-tuned, you can test its performance by running inference on test cases. This helps validate its spatial reasoning abilities. Here:
@step
def evaluate(model, processor, sample, max_new_tokens=1024) -> Annotated[List, "response"]:
    text_input = processor.apply_chat_template(
        sample, tokenize=False, add_generation_prompt=True
    )
    sample = sample[0][0:2]
    image_inputs, _ = process_vision_info(sample)

    model_inputs = processor(
        text=[text_input],
        images=image_inputs,
        return_tensors="pt",
    )

    generated_ids = model.generate(**model_inputs, max_new_tokens=max_new_tokens)

    trimmed_generated_ids = [out_ids[len(in_ids) :] for in_ids, out_ids in zip(model_inputs.input_ids, generated_ids)]

    output_text = processor.batch_decode(
        trimmed_generated_ids, skip_special_tokens=True, clean_up_tokenization_spaces=False
    )
    return output_text
We can visualize it the following way:
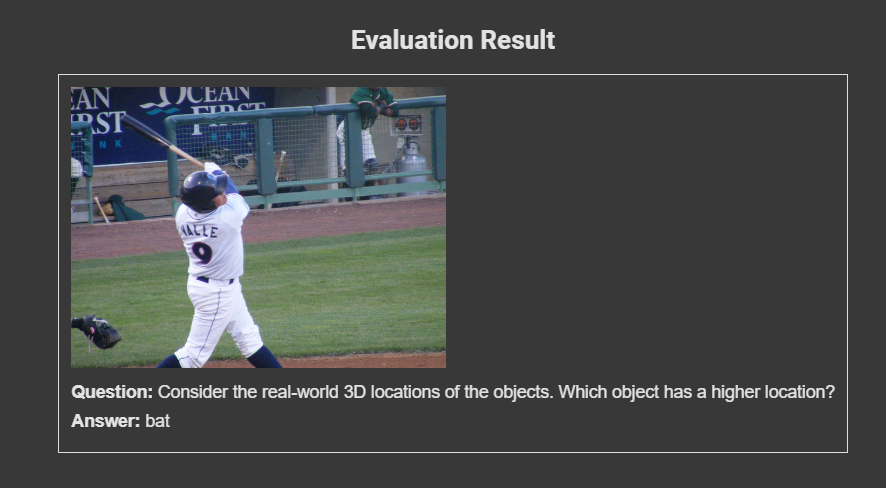
@step
def visualize(sample, output_text) -> HTMLString:
    sample = sample[0][0:2]
    image_url = sample[1]["content"][0]["image"]
    image_data = fetch_image(image_url)
    image_base64 = base64.b64encode(image_data).decode('utf-8') if image_data else None
    image_tag = f'<img src="data:image/png;base64,{image_base64}" style="max-width: 300px; height: auto;">' if image_base64 else '<p>[Image not available]</p>'

    html_content = f"""
    <div style="text-align: center; font-family: Arial, sans-serif;">
        <h2>Evaluation Result</h2>
        <div style="border: 1px solid #ddd; padding: 10px; margin: 10px; display: inline-block; text-align: left;">
            {image_tag}
            <p><strong>Question:</strong> {sample[1]["content"][1]["text"]}</p>
            <p><strong>Answer:</strong> {output_text[0]}</p>

    """

    return HTMLString(html_content)
Let’s load the model pushed on the hub by fetching it from the last run and provide it with a test sample:
@pipeline()
def evaluate_pipeline():
client = Client()
latest_run = client.get_pipeline("finetuning_pipeline").last_run
model_id = (latest_run.steps["push_to_hub"].outputs["output_dir"])[0].load()
raw_data = load_data()
preprocessed_data = preprocess_data_step(raw_data)
formatted_data = format_data_step(preprocessed_data)
train_set, eval_set, test_set = split_data_step(formatted_data)
model = Qwen2VLForConditionalGeneration.from_pretrained(model_id)
processor = Qwen2VLProcessor.from_pretrained(model_id)
output = evaluate(model, processor, test_set)
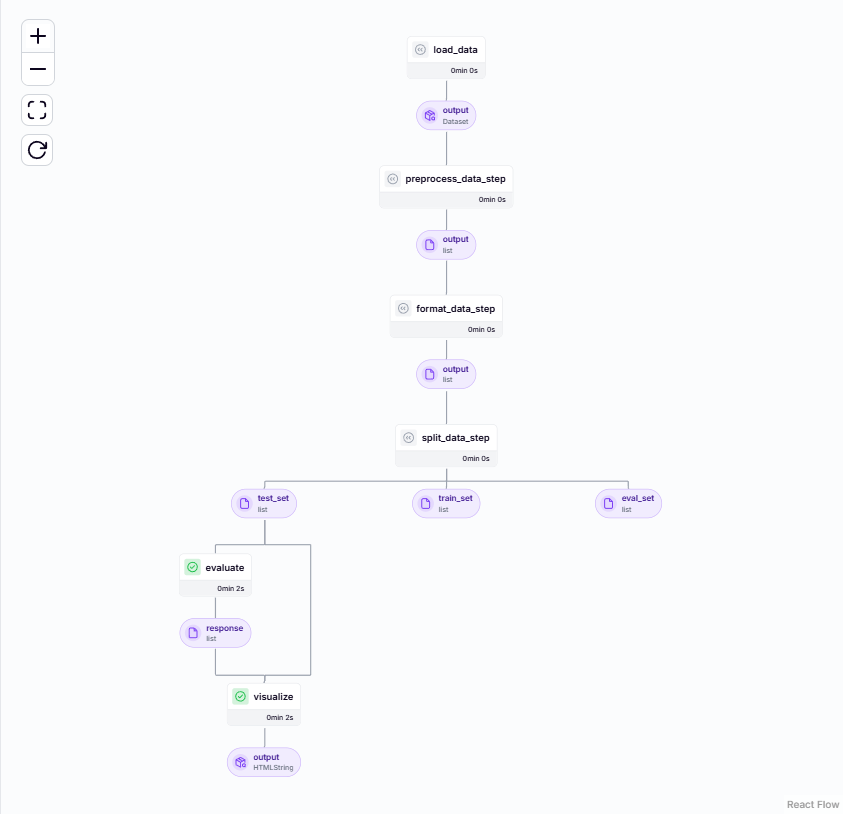
visualize(test_set, output)Here’s the evaluate pipeline on ZenML:
Here’s the output result:
Deployment
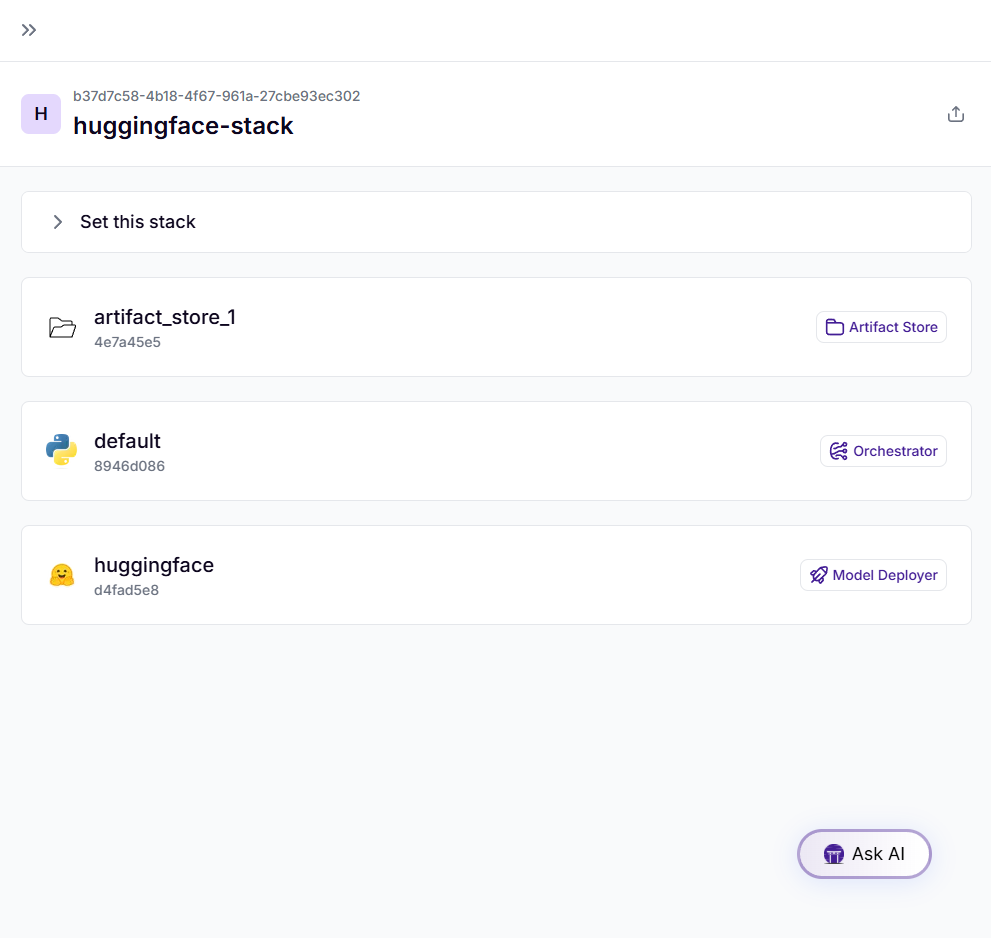
Deploying the model using ZenML allows seamless integration into real-world applications. Follow these steps to create and configure a stack:
!zenml stack register huggingface-stack -o default -a artifact_store
!zenml model-deployer register huggingface-deployer --flavor=huggingface --token=<token> --namespace=<namespace>
!zenml stack update huggingface-stack -d huggingface-deployer
!zenml stack set huggingface-stack
To make sure everything is set up properly, here’s what we can do:
!zenml stack describeWe can also see that in the dashboard:
Before this step, add billing to the Hugging Face account for inference endpoints. Several deployment options are available, but since the model requires at least 16GB of VRAM, we’ll deploy it on an Nvidia T4. Here are the pricing details for other instances as well.
Let’s run the deployment pipeline:
from zenml import pipeline
from zenml.config import DockerSettings
from zenml.integrations.constants import HUGGINGFACE
from zenml.integrations.huggingface.services import HuggingFaceServiceConfig
from zenml.integrations.huggingface.steps import (
    huggingface_model_deployer_step,
)

docker_settings = DockerSettings(
    required_integrations=[HUGGINGFACE],
)

@pipeline(enable_cache=True, settings={"docker": docker_settings})
def huggingface_deployment_pipeline(
    repository: str,
    model_name: str,
    namespace: str,
    timeout: int = 1200,
    accelerator="gpu",
    instance_size="x1",
    instance_type="nvidia-t4",
    region="us-east-1",
    framework="pytorch",
    vendor="aws",
    task="image-text-to-text",
):
    service_config = HuggingFaceServiceConfig(repository=repository, model_name=model_name, accelerator=accelerator, instance_size=instance_size, instance_type=instance_type, region=region, vendor=vendor, framework=framework, task=task, namespace=namespace)

    huggingface_model_deployer_step(
        service_config=service_config,
        timeout=timeout,
    )
Finally, execute the deployment pipeline:
huggingface_deployment_pipeline(<huggingface repository>, <model name>, <namespace>)Here’s the DAG for the deployment service:
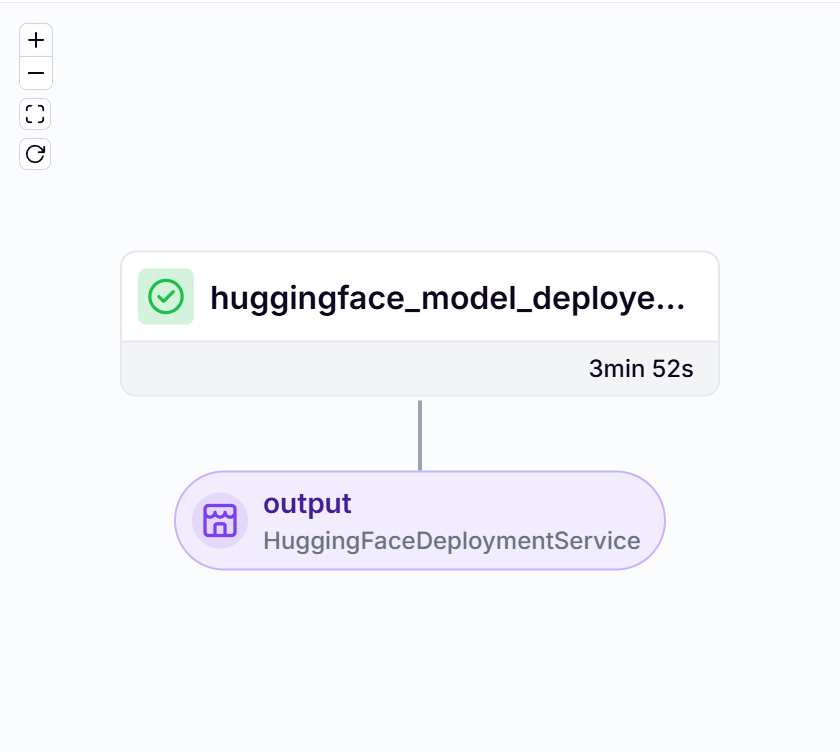
We can also verify it through the Inference endpoint:
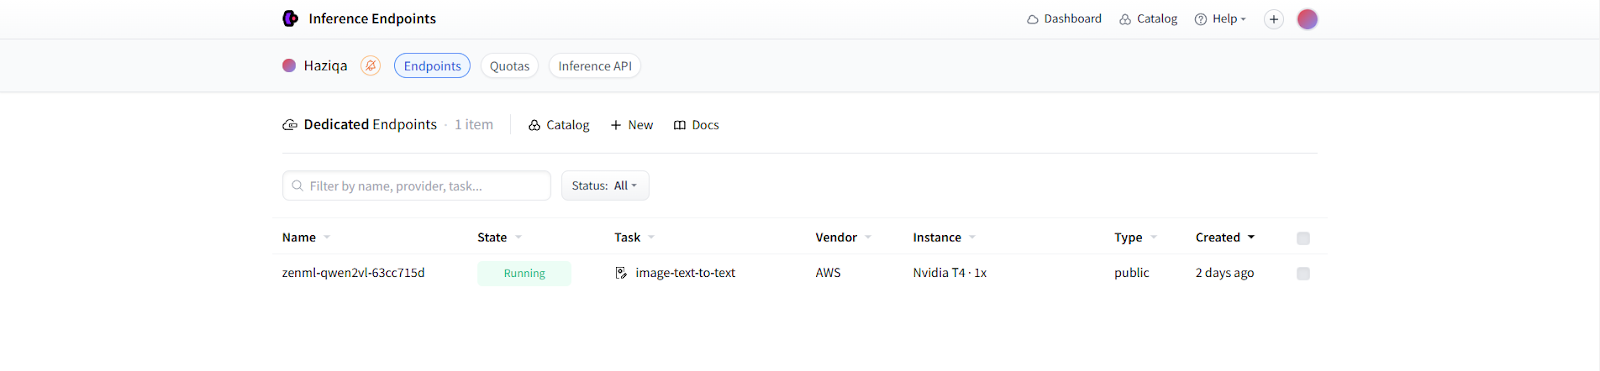
The service is up and running, and we can now send POST requests to the model using the following method:
import requests

API_URL = <Your URL>
headers = {
  "Accept": "application/json",
  "Content-Type": "application/json"
}
def query(payload):
  response = requests.post(API_URL, headers=headers, json=payload)
  return response.json()

payload = {
  "inputs": {
    "text": <Question>,
    "image": <Image_URL>
  },
  "parameters": {
    "max_new_tokens": 1024
  }
}

output = query(payload)
We have fine-tuned a vision model plus deployed it on Hugging Face inference endpoints with ZenML. For the following image and question, we get the following response:

Question: Consider the real-world 3D locations and orientations of the objects. If I stand at the woman's position facing where it is facing, is the bicycle on the left or right of me?

Model Answer: Right of me
Conclusion
Following protocols and workflows for developing and deploying large multimodal models goes a long way. As these systems are compute and effort-intensive, it’s recommended to stick with LLMOps best practices to track and trace pipeline problems.
ZenML provides a comprehensive toolset for LLMOps of multimodal models, as we also saw in the article above, where we fine-tuned a Qwen-VL vision model on the dataset and deployed a service on inference endpoints. Many steps are automated, such as adding more data, fine-tuning the model, creating new versions, and deploying them. This allows engineers to focus more on the experimentation phase rather than getting bogged down with repetitive tasks.
Sign up today to ZenML Pro to explore our platform and integrate it into your system for LLMOps on complex multimodal models.